Large Guide: Setup
Creating a Work Area
Table
Your work area has a table with two chairs that you can sit at. The table is around 6ft/2m long and deep enough to really utilize the space.
The table is made out of a material that, if you were to accidentally spill the compounded preparation onto it, that it wouldn’t absorb any and there would be no interaction between the table material and any of the excipients. For this reason you should attempt to use stainless steel or marble. Certain plastics can be okay if you cross check them against the excipients as well as isopropyl alcohol and whatever your anti-viral cleaning agent is.
A safe, large plastic board on top of a wood table can be a cost cutting measure.
Clean Room with Positive Pressure
Surrounding the table you have hung plastic sheeting from the ceiling with painters tape. You’re ideally creating a decent (doesn’t need to be perfect) seal between the sheeting and the ceiling. Similarly, you’re taping the sheeting to itself where new sheets overlap to create a seal on the walls. Also do this on the floor. Leave a large overlap unsealed for a doorway.
Get crafty, and fashion a way to direct airflow from outside your tent, through your HEPA filter, and then blow the clear air directly into the tent. The outlet for the HEPA blowing clean-ish air into the tent needs to be air tight. The HEPA should not be directly next to the doorway, but should not be on the opposite side of the door so that the workspace is in the middle. Ideally the outlet is somewhat low to the ground.
Here’s a diagram I made in MS Paint.
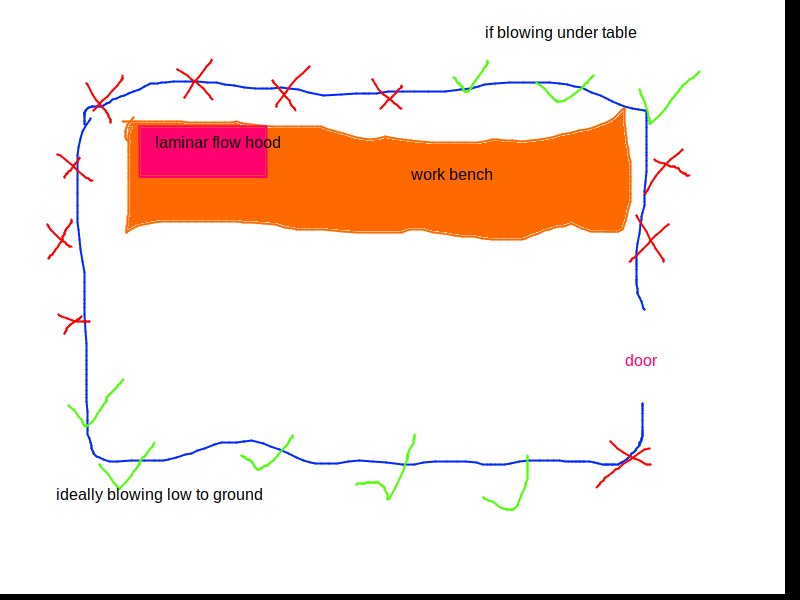
If done correctly, the HEPA will inflate the tent. All the walls will push out, and there will be a gust of wind leaving the tent at all times directly through the doorway. This is good. We want the “positive pressure environment” to direct air out of the door. Now we know that all the air in the room has been pre-cleaned through your HEPA.
Notice that the HEPA does not have the opportunity to blow directly onto the table, or across the work area. It’s especially not blowing on the laminar flow area.
If I were to go all out, the HEPA would be MERV 17, but anything that is controlling for dust is better than nothing.
Controlling for Dust and Pet Hair
The makeshift clean room with the positive pressure environment will prevent stray dust and pet hair from wandering into the space. However, dust and hair can still get in one major way: when you walk it right through the door!
Everything you bring into the clean room, including chairs, tables, lights need to be wiped down proper. Ideally you’re not brining in any upholstered furniture into the room.
Additionally you need to be controlling for pet hair and dust on your clothes, skin, and shoes. Don’t roll around in your cats bed and then walk into the clean room.
Creating a Demarcation Line
If you have room, create a little ante-chamber to your clean room that has a clear demarcation line on the floor. This is the line that can’t be crossed if the person isn’t wearing the proper clean room materials. The person should also avoid wearing their clean room gear out into the rest of the space. It would be helpful to have a coat hanger or similar in here to give the workers a place to hang everything.
Wash and Sterilize Tools and Vials
Aluminum Foil Hats and Pouches
This can be done days in advance. You can also use autoclave pouches for the autoclave items but I don’t use those so I can’t advise you on how to do that best.
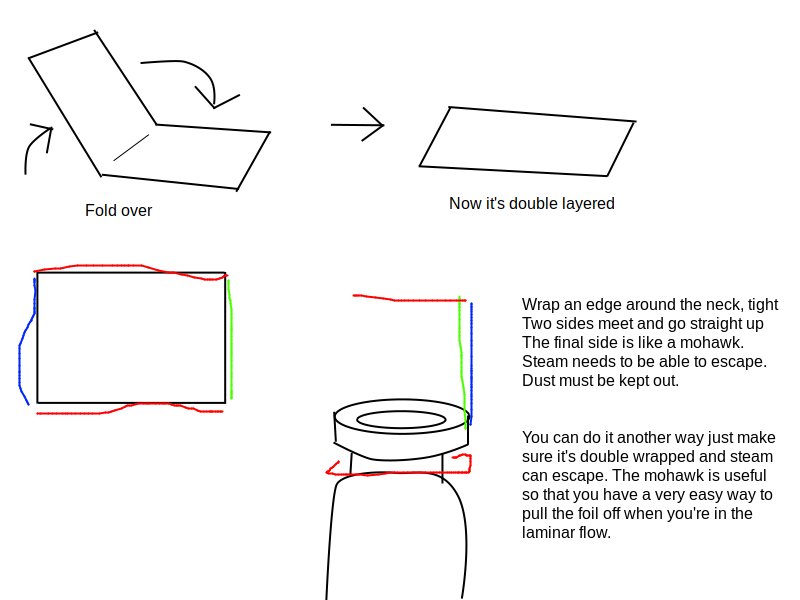
Everything you sterilize needs to be covered in foil so that when you remove it from the oven/autoclave it is protected from particles and unsterile air. All foil should be double layered so as to be extra safe in case there is a tear or other mistake.
For autoclaved items the foil needs to be wrapped in a way to allow steam to enter the pouch or container.
For dry heat sterilized items, the foil needs to be wrapped in a way so as to allow residual moisture from wash/rinse to escape.
Every vial needs a hat. So that means if you’re trying to sterilize 250 vials, you need to prepare 250 small sheets of foil to use as hats. This takes awhile to prepare. If you use scissors to cut the foil it causes the layers to stick together, so then you need to peel them apart (you won’t want to have to peel them apart while your hands are wet and you’re wearing gloves).
I recommend you or someone else prepares these sheets for hats days in advance of your brew. Try it out yourself and decide what size you want.
Here’s an MS Paint suggestion on how to do it:
Washing Before Sterilization
Before you sterilize items, you need to do a thorough wash and rinse. It doesn’t matter if your item is brand new, if it just came out of the dish washer, or etc. You should wash it with Alconox or a similar cleaner that is designed for cleaning laboratory glassware. After you scrub it with Alconox, you should do a three stage rinse in distilled water, attempting to fully rinse the alconox off the item.
You can wrap the item/vial in the foil while it’s still wet. This is distilled water and will cleanly evaporate off when you put the item in the oven.
Put all your items set for the oven on a foil lined tray.
Items set for the autoclave will be wrapped in a way that lets steam in. You might poke a few holes in the foil to encourage that steam. The holes should be in such a way that they won’t let dust or bacteria fall in once you open the autoclave
Autoclave (Moist Heat)
Rubber stoppers need to be autoclaved.
Info about using an instant pot as an autoclave is here, though I recommend that you purchase an actual autoclave instead. A stovetop autoclave isn’t terribly expensive and is more reliable.
Oven (Dry Heat)
All glass should be depyrogenated in an oven.
Info about using an oven to dry heat sterilize is here
Removing from Autoclave / Oven
As the items come out of their sterilization cycle, cover them in yet another layer of foil, such as one large piece that can keep dust out and bacteria from falling on them.
Keep an extra-large tupperware that is meant to store all your sterilized items in. Before using it for storage, clean it with the anti-bacterial/vial/fungal cleaner. After all items are cooled out of the oven, transfer them into the tupperware and keep it sealed. The tupperware should live in your assembled clean room to limit it’s exposure to unclean air.
General Setup
Make sure your space is setup in a way where you can do all the work that you need to do without having to go in and out of the clean room constantly. Organize your items so you can work with them effectively.
Time to mix!