How to Export This Site as PDF
This single page contains the full website listed in the same order as the sidebar. In your browser, simply attempt to print the page, then, instead of a printer select “Save to PDF.” Now you have the whole site available to you offline.
Note that the recipe calculator does not work on the PDF so be sure to get your recipe ahead of time.
404 - Page Not Found
This URL may have changed! Try using the search bar to find what you’re looking for.
How to Make DIY HRT for You or Your Community
Version 0.6 (Beta)
HRT Mom is a website dedicated to science-based, and lab tested methodology for homebrewing HRT. While there is much speculation as to how to best make HRT for injections at home, HRT Mom sticks just to the facts and avoids making assertions based on popular opinion or what feels most convenient.
Homebrew is hard. Consider buying from a community trusted vendor or making topicals before embarking on making your own injectables.
Please read the legal disclaimer before proceeding

I have spent over a thousand hours pouring over lab manuals, compounding manuals, USP guidelines, research papers, consulting with professional scientists, working in my home lab, injecting what I create, and writing reports on all the information I learn. All of this work is solely to bring you this guide. I’ve additionally invested thousands of dollars into equipment and experimentation to help work out the kinks in my lab. Up until recently brewing HRT at home has been a task of approximation. People share and publish guides and info on how compound HRT but they never fully understand what it is that they’re writing about. This website changes that. All information that is shared here is based on empirically validated research and its resulting logic. Any claim that cannot be backed up is flagged as an opinion of the author.
Start Here
| Sidebar Category | Explanation |
|---|---|
| How to Use This Website | An overview of how the site is structured and how it’s intended to be used. |
| Knowledge Base | Details all the ancillary knowledge that it’s good to have when brewing |
| Homebrew Guides | Details 3 different methodologies for how to make homebrew, depending on the volume you’re making |
| Homebrew Method Critiques | Analyzes various popular homebrew guides and provides science backed critiques on them including Lena’s and HRT Cafe’s |
| Blog Posts | Articles looking at specific topics related to homebrew that might not fit anywhere else |
| Library | Gathers the most important source material and makes it accessible for download or viewing |
| x | Any title with an “x” next to it indicates that I’m still working on the page. |
Dear Penelope

Have a question about something on the website? Have a question about your brew process? You are welcome to send your question, in letter format, to my email. Questions that cannot be answered in a short email response will be fully anonymized and published on the website with my response so everyone can benefit. Find my contact information here.
Export this Site
Our lovely developeromg that's me wow a shoutout 🥺❤️ has created a module to allow this entire site to export as a PDF. Find that here.
Find an Error?
Please email to let me know. Be sure to include your reasoning for why it’s an error and cite your sources if applicable. Contact.
Emails that are critical of this site’s methodology that are unable to back up their critique with mainstream published research will be ignored.
Donate
I am poor and I have devoted over a thousand hours and thousands of dollars to this project. Donations will go towards continuing research. Donate here. Contact me me first if you’d like to discuss how your donation will be used, we can absolutely work out a plan together.
Legal
Please do read the legal disclaimer. It’s short.
Vendors
this page is incomplete and possibly out of date
Vendors are not vetted. We do not know if these vendors follow the same brew methodology as taught on this website. We know that the online DIY community generally has good luck with these vendors. Their vials have not been submitted to mass spectrometer or sterility testing.
Homebrew Vendors:
0Closed or Not Recommended Vendors:
0Contact

My associate, HRT Dad, may reply.
Encryption
If you need to send us an encrypted message, please use proton mail in order to leverage the built in end-to-end encryption. If you’d prefer to use a different type of encryption, please send us an email and let us know.
Response Time
We check the email at most once a week. Please be patient for our response.
Legal
Legal notices on this page are based on US law but may pertain to other jurisdictions.
Testosterone
Please note that manufacture, possession (without prescription), or sale of testosterone is illegal in some jurisdictions, including the United States. This guide is intended to be used in full compliance with the law. Testosterone should only be imported, compounded, or sold in jurisdictions where it is legal to do so.
Estradiol
The manufacture, possession, or sale of estradiol may be illegal in the United States. Estradiol is not a controlled substance but it is still a regulated pharmaceutical. This guide is intended to be used in full compliance with the law. Estradiol should only be imported, compounded, or sold in jurisdictions where it is legal to do so.
Not for Medical Use
All compounded preparations made using this site are not considered for medical use, and should not be labeled as such. Labeling them as medicine would be inaccurate as they do not go through any regulatory process.
Do Not Suggest How to Use
As this is not medicine, and you are not a doctor or a pharmacist, it would be inappropriate and potentially unlawful to suggest to people how they should use it.
Not at Fault
HRT Mom cannot be held responsible for how the information on this website is used. Proceed with caution.
Donate
HRT Mom performs experiments and research in an effort to improve the processes documented on this website. All results of experiments will be shared freely with the public.
Monero (preferred)
88Xq69Hj2ax2L3qJCEnHv5iRCDSADq1Uxafy2n1RkHJhFQrNqW7VEfjHuT1zdSPNe1PrNwkzzdZTyLyEmybp89whBq982zYBitcoin
bc1qrtqsfsjkcujtjcpychtrg9f6cmxvznjy3g0eztNeeds
- Full sterility testing setup ($2,000+)
- API reagent testing setup ($unknown, pending research)
- How much benzyl benzoate is needed to stay in solution? (Anon reports crashes that are invisible at low BB vol. but hurt to inject)
- Various homebrew methods vs. sterility testing
- Breaks from work in order to focus on project
HRT Mom Backup
This site is hosted at https://hrt.mom (Swedish Server, subject to change)
There is a backup of this site at a slower server at https://scienceclass.pages.gay (UK and Netherlands Servers, subject to change)
I recommend using the hrt.mom domain unless there’s a problem, then use the backup.
The two sites should always be in sync with identical content unless we’re experiencing server issues.
How to Use This Website
Determine which guide you’re following
- The personal size guide is to help you make one or two vials for you and maybe a very close friend.
- The medium size guide is for around 20 or so vials. I find this methodology absolutely maxes out at around 60 vials without some teks.
- The large size guide is to help you make many, many vials. This methodology maxes out at around 200 vials because you’re a human, not a machine.
Read about sterilization theory
This page describes how sterilization works in the guides I write, and can also help you understand why other guides fail to properly sterilize. I’d label this as required reading, especially if you’ve brewed before with other methodology.
Read your guide in full
You need to have an understanding of your guide as a whole unit. You by no means need to memorize it, but you should be able to see the full picture of what the guide is instructing you to do before you do it.
Build your knowledge
As you’re getting all your supplies and materials in order, spend some time reading through the side bar, especially the knowledge base section. You don’t need to ready every single thing in full, but you should familiarize yourself with what information is available on this website. If a question comes up in the brew process, you should be relatively confident that you can get on this website and answer the question for yourself.
People who do this work professionally don’t just come off the street and start working. They have a very serious amount of study and training that they have to do before they’re allowed anywhere near stuff like HRT, which is considered a “high risk” preparation, and of the most difficult to compound correctly (even in a proper lab setting). Don’t discard how the professionals work, consider them role models for how we should approach our home lab projects.
If you want to do this correctly, especially for the medium and very especially for the large guides, you’re going to need to work very hard, study hard, and strengthen your mindset. Brewing in volume is not a weekend project.
Build your Mindset
Very Important Step!
What you’re trying to do, compound HRT at home, is not a fully understood task. Actual step-by-step guides from state of the art pharmaceutical labs have not leaked to the public, and even if they had we wouldn’t have the equipment to replicate them. So not only is this difficult to do correctly, but we don’t have a 100% understanding of what “correct” even is.
Your mindset, then, becomes your most invaluable ally.
You should always be asking questions, striving to understand better. If you disagree with me, or you disagree with someone else giving advice, can you find hard data backing what is true? And can you think critically enough to determine if the data is actually relevant or not? Always dig deeper, always expand your knowledge, always ask questions. Never assume you know anything for certain.
If you’ve brewed before…
It’s worth comparing all the differences between what you did last time and what you’ll do this time. Building up an understanding for why things are done one way, and not another, can help you to perform better when you’re working in your home lab.
Check out the Homebrew Methods Critiques menu in the sidebar to see if you’ve used any of the guides listed there in the past.
Familiarize yourself with the available teks
Tek: a technique for completing a DIY, science based task. A popular term in the home mycology community.
Also in the sidebar are some teks that can make your life way easier. They’re designed to plug into the guides that you’re following (medium and large only).
Autoclave Sterilization
Better than Using an Instant Pot
A true autoclave has substantial advantages over using an instant pot:
- Gets up to proper temperature
- Gets up to proper pressure
- Needs to operate for less time
- More reliable
- Able to use sterilization strips to verify if temp/pressure achieved
- Better data to support use
- Substantially better water control, resulting in sterilized items that are less wet
How to Operate an Autoclave
Your autoclave needs to be operated according to the manufacturers instructions. There’s no universal way to do this.
All items need to be washed in alconox and triple rinsed in distilled water before being loosely packed into autoclave pouches.
Inside the autoclave you can loosely drape a towel over the items in pouches. This towel will collect water that drips from the lid of the autoclave and will prevent that water from getting into the pouches.
Sterilization Parameters1
- Temperature: 121°C
- Pressure: 15 psi
- Time: 20-60 minutes*
*You’re supposed to choose a time that you can verify is correctly sterilizing your product. Since that’s typically out of scope for DIY operations, you may choose to sterilize for the maximum recommended time. The CDC recommends 30 minutes2.
Dealing with Wet Pack
After removing the items from the autoclave inspect them for “wet pack.” Wet pack is when water gets into your autoclave pouches. This is bad. Water that is left in a pouch, undealt with, can promote the growth of bacteria. Expensive, lab autoclaves have features that prevent or reverse wet pack automatically. To deal with wet pack you can transfer the pouches to a foil lined baking dish, that you then cover with another layer of foil. Put this dish in the oven at a very low temperature, such as 170F, you can even leave the oven door slightly open to promote a lower heat. Check on the wet pack every 5-10 minutes until you’re confident that all the water has been evaporated.
References
View the library page for access to some PDFs.
Footnotes
-
USP 797 section 10.3, 2024 edition ↩
Benzyl Alcohol
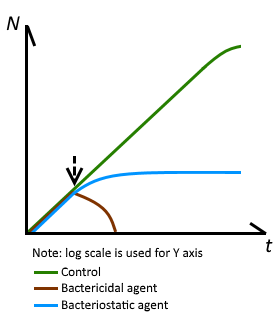
Benzyl alcohol is bacteriostatic and is used as an antimicrobial preservative against Gram-positive bacteria, molds, fungi, and yeasts, although it possesses only modest bactericidal properties1
Benzyl Alcohol (BA) is a required ingredient in all homebrews.
Benzyl Alcohol can break down2 and evaporate3 with heat. Never heat BA, even in a sealed vial.
BA is a bacteriostatic preservative that stops bacteria from multiplying, but does not kill bacteria.
NEVER increase the concentration of BA for ANY reason. Follow a proven recipe closely, one that likely recommends 2% BA. Injecting BA in higher concentrations than what is typically in a vial of HRT, 2%, is potentially dangerous.
Concentrations less than 2% could allow bacteria to proliferate.
Don’t heat it!
Benzyl alcohol is frequently used as an antimicrobial preservative or co-solvent in a varity of pharmaceutical injection formulations. The main toxic oxidation product, benzaldehyde, arises from the oxidation of benzyl alcohol upon long-term storage or heat sterilization of parenteral dosage forms containing benzyl alcohol, if oxygen is not excluded totally by nitrogen flashing. The presence of this potential impurity needs to be monitored owing to its reactivity and toxicity2
This paragraph is in line with the compounding industry’s steady stance that anything containing benzyl alcohol needs to be sterilized using filtration + aseptic technique, and not heat.
Further, benzyl alcohol has a flash point of just 101°C (214°F)3. This means that if you are to ignore the above advice, and you try to sterilize BA through heat, that a significant portion of it is being evaporated. This causes a problem because 1) we don’t want the BA to evaporate, we want it to stay in solution, and 2) if it’s evaporating out of an open container, this is a major flammability hazard.
10.1 Reactivity
Forms explosive mixtures with air on intense heating.
A range from approx. 15 Kelvin below the flash point is to be rated as critical.3
15 Kelvin below the flash point (101°C/214°F) is ~87°C/189°F — this is far below autoclaving temperature (121°C) or dry heat sterilization temperature (160°C).
10.4 Conditions to avoid
…
Strong heating.3
Benzyl alcohol oxidizes slowly in air to benzaldehyde and benzoic acid; it does not react with water… some solutions may generate benzaldehyde during autoclaving.1
So let’s not autoclave it or dry heat sterilize it? Rule #1 of homebrew: Don’t fuck with your benzyl alcohol.
Careful around plastic and rubber
Problems may occur when polystyrene syringes are used with certain types of drug products containing benzyl alcohol since these agents can extract and dissolve the plastic. At times the rubber tip may release a constituent to the drug product.4
Benzyl alcohol can damage polystyrene syringes by extracting some soluble components.1
According to wikipedia, most medical syringes are made of “polyethylene.” I’ve also seen a lot of syringes made of polypropylene on Google. So thinking these polystyrene syringes might not be too common. Regardless, the issues with the rubber tip are universal to the type of plastic in use.
It may, then, be best to measure the BA for your brew using a glass graduated beaker or cylinder so that the 100% BA doesn’t make contact with the rubber. Or, if your BA is in a sterile 100mL vial, to draw from it in a way that minimizes contact with the rubber in the syringe.
Neutralize it for Sterility Assurance Testing
Antimicrobial activity is reduced in the presence of nonionic surfactants, such as polysorbate 801.
If you’re performing sterility assurance testing, BA will interfere as it prevents bacteria from growing. You can use polysorbate 80 to neutralize it. It’s unclear how much is appropriate to use, pending further research.
References
View the library page for access to some PDFs.
Footnotes
Benzyl Benzoate
Benzyl Benzoate (BB) is a solvent found in most homebrew and pharmecutical vials.
Tyger’s guide says:
Lower concentrations of BB are generally desired to decrease the amount of post-injection pain that some people experience. However, there are so many different combinations of hormone ester, hormone concentration and carrier oil that it’s diffcult to know how low you can go. Low solubility will paradoxically cause more pain, even if the ester hasn’t visibly crashed.
Some homebrewers claim that you don’t need any BB at all, and I often get requests for custom vials without it, so consider stocking this as an option. I think a lot of people assume they are sensitive to BB without first trying another carrier oil or considering that their post-injection pain maybe caused by a dirty vial. Maybe I’m just reluctant to stop using BB, as it makes the oil thinner and therefore easier for me to work with.
Keep in mind that Tyger does not cite their sources, and that this information is word of mouth.
Don’t expose to heat
Exposure to excessive heat (above 40C) should be avoided.1
Unfortunately there is not more information available from this source on why we should avoid heat. However, your BB will be mixed with BA, which, we have better data for, and also should avoid heat.
References
View the library page for access to some PDFs.
Footnotes
-
Handbook of Pharmaceutical Excipients (2009), page 67 ↩
Bubble Point Testing
Syringe filters are how our compounded preparation achieves sterilization. Bubble point testing is how we verify that our filters maintained integrity during the filtration/sterilization process.
Especially in lieu of more formal sterility assurance testing, bubble point tests are our primary method for determining if our compounded preparations are indeed sterile.
A bubble point test will render your filter no longer sterile. Once you do the test, it’s important to discard the filter. Read more below.
Bubble point tests are standard in lab settings, however this particular methodology for doing them seems to have come from HRT Cat.
Diagram
Concept
A syringe filter that is wetted with the preparation you’ve made will resist air being pushed through the membrane of the filter. However, once a significant enough amount of pressure of air is being pushed through the filter, eventually the filter will give way and let the air begin to pass.
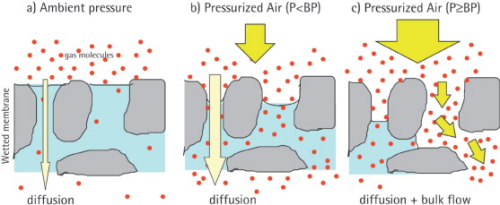
So what we’re doing is checking at what specific pressure did the filter membrane begin to let air through. All filters of the same manufacturing batch, that are without defect, and are wetted with the same substance should begin to let air pass at roughly the same pressure.
We can use this info to check, then, if the filter broke or degraded during the filtration process.
We dip the end of a needle that comes out of this filter into a cup of water so that we can see when air begins to escape the filter.
Preparing a New Batch of Filters
From your new batch of filters, take as little as one, but as many as three filters. Pass a small amount of the compounded preparation through them, to the point where the liquid is going into the filter and is coming out the other side. This is considered “wetting” the filter, so that all of its pores are saturated in the compounded preparation.
Now that the filters are wetted, check their bubble point, taking the average of the three, and discarding any outliers.
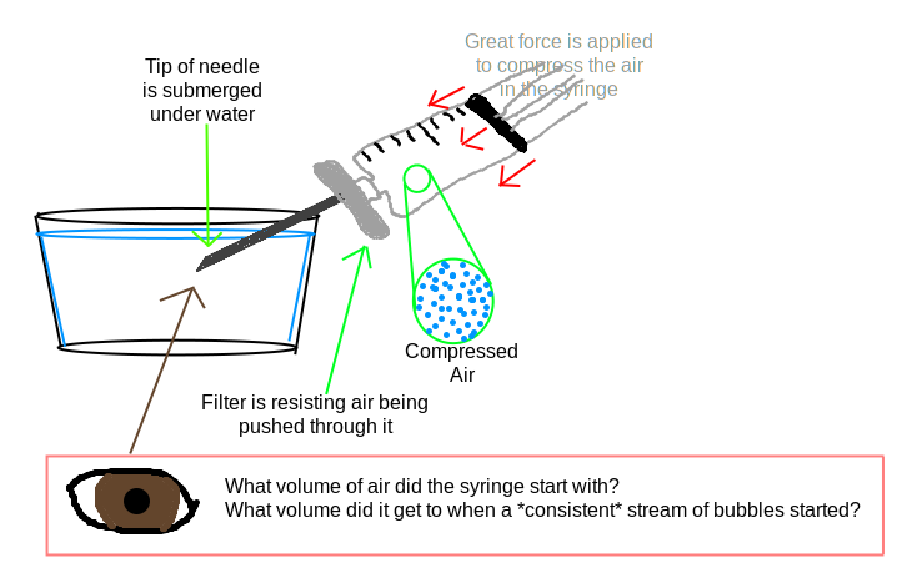
How to actually do the bubble point test
- Find the current air pressure. At sea level this averages at about 14.7psi. You can lookup the current air pressure where you’re at with a weather site.
- Take a large syringe, such as 20mL. Fill it up with air to a benchmark of your choice. I always fill up to 15mL of air, every time, for consistency
- Attach your used filter you want to test. (The filter must have had your preparation passed through it so that the pores are saturated).
- Attach a large gauge needle, such as 18g, to the end of the filter
- Submerge the needle in a glass of water, but not letting the filter touch the water.
- Compress the air in the syringe, trying to push the air through the filter and into the water
- Keep pressing down, remembering what mL you started at, and watching for a steady stream of bubbles to come out of the needle. A few bubbles is fine, and not relevant, you’re looking for a stream.
- Make note of what mL you were compressed to when the stream of bubbles started.
- You’re done.
Because I always start at 15mL of air, I know without doing math, that depending on my filter batch, my target bubble point of an in-tact filter is usually around 4mL (about 55psi).
Now you need to do a little bit of math to convert these values into a PSI bubble point. Open up the Boyle’s Law Calculator . Use today’s air pressure according to the weather as the starting pressure, use your starting volume in the syringe, and the volume where you saw the stream of bubbles appear. You should then be given a “final pressure” that tells you what the bubble point is.
You can now determine if your filter held up during its filtration. You should discard the filter and not use it again.
My bubble point is less than it’s supposed to be
Sometimes your bubble point turns out to be 45psi when it’s supposed to be 55psi, for example. Other times, you’ll see something more dramatic, and your bubble point will be 25psi when it’s supposed to be 55psi.
With the 25psi value, it’s safe to say that your filter broke in some way during filtration, and that the batch you filtered needs to be refiltered as it cannot be considered sterile.
When the deviation is smaller, that’s a tougher decision. I try to consider that my bubble point needs to be consistently at the benchmark I set for the batch of filters, in this example, that’s 55psi. So anything less and I consider that something might have gone wrong, I might have broken the filter somehow, or it was just a bad filter from the factory.
Someone less risk adverse than myself might consider that a small deviation is fine, and they want to consider the filtered preparation sterile. I have no data backing this up, and don’t know how to reliably tell what the cut-off is with bubble points. So my best advice is to stick to the bubble point you expect to get, and whether it’s a large or small deviation you should refilter if needed.
This test renders filters unsterile
With a large amount of pressure pushed up against the filter, and the needle leaving the filter being in unsterile water, if there is even the slightest decrease in pressure from your hand wavering or getting tired, while the needle is under water, you can notice that the needle will suck up a tiny bit of water.
This water is unsterile and impossible to get out of the exit side of the filter. Any sterile preparation that is passing through the filter now could be coming into contact with this water, effectively making the preparation unsterile.
References
View the library page for access to some PDFs.
Footnotes
Carrier Oils
Most above board compounding pharmacies use castor, sesame, cottonseed, or sunflower oil for making HRT.
Most DIY homebrewers are using medium chain triglyceride (MCT) oil. Sometimes called “Viscoleo,” MCT oil is more viscous and therefore may make the absorption rate quicker. It’s viscousness makes it easier to inject for the clients and easier to filter for the brewers.
MCT oil is a mix of C8 and C10 fatty acids. Your bottle of MCT should tell you the ratio of these two, I’ve found that most pharmaceutical grade MCT is a 60/40 blend of C8/C10. If you’d like to calculate the oil density you should know the blend ratio.
Some more info from an article on Transfeminine Science below:
It is in any case known from other studies that different oil vehicles are absorbed at different rates from the injection site and can result in different concentration–time curve shapes. This is thought to be due to differences in oil lipophilicity and depot release rates. Viscosity of oils has also been hypothesized to potentially influence rate of depot escape. However, research so far has not supported this hypothesis. Oil vehicles can vary with injectable estradiol preparations even for the same estradiol ester. For instance, pharmaceutical estradiol valerate is formulated in sesame oil , castor oil , or sunflower oil depending on the preparation (Table ). It is notable however that these three oils have similar lipophilicities (Table ). On the other hand, homebrewed injectable estradiol preparations used by DIY transfeminine people often employ medium-chain triglyceride (MCT) oil as the oil vehicle. This oil (in the proprietary form of Viscoleo) has notably been found to be much more rapidly absorbed than conventional oils like sesame oil and castor oil in animals. In addition, although based on very limited data, MCT oil has been found to give spikier and shorter-lasting depot injectable curves in humans. As such, injectable estradiol preparations using MCT oil as the vehicle may have differing and less favorable concentration–time curve shapes than pharmaceutical injectable estradiol products. Other excipients, like benzyl alcohol , as well as factors like injection site and volume, have additionally been found to influence pharmacokinetic properties with depot injectables. Excipients besides oil vehicle also vary by formulation (Table ).
Corsi-Rosenthal (CR) Box
A Corsi-Rosenthal Box, more often called a CR box, is a DIY fan powered HEPA filter that you can build for less than $100, often less than $50.
CR boxes were invented during early covid when there was a larger demand for high quality, efficient, and cheap air filtration. Now, even as the public doesn’t care about the raging pandemic anymore, CR boxes remain a vital tool for covid safety. In your DIY lab they are a cheap and effective tool for creating filtered air in your brew space.
This is a perfect alternative to buying an expensive HEPA filtration system.
If you do some investigation, you have a little extra time, and you’re handy (which you should be to be homebrewing), you can build a CR box that utilizes a series of computer fans for a smaller footprint box.
Dry Heat Oven Sterilization
Dry heat sterilization is any type of heat sterilization that does not include both steam and pressure. Typically this looks like heating something in an oven until the heat kills the bacteria by causing “oxidation of cellular constituents and consequently cell death.”1
Dry Heat Sterilization Temperatures1
| Temperature | Time |
|---|---|
| 170°C/338°F | 60 mins |
| 160°C/320°F | 120 mins |
| 150°C/302°F | 150 mins |
Depyrogenation Temperatures
| Temperature | Time |
|---|---|
| 250°C/482°F | 30 mins1 |
| 200°C/392°F | 60 mins2 |
Sterilize vs Depyrogenate
Sterilization is a process that removes or kills all forms of microscopic life3.
Depyrogenation is the removal or inactivation of pyrogens4.
Sterilization and depyrogenation are distinctly different processes that have different parameters and goals. Conveniently, when using dry heat to inactivate pyrogens, sterilization is also achieved. I therefore recommend always depyrogenating all materials in your brew that can withstand the heat. Ultimately this looks like running all glassware through a depyrogenation cycle in order to achieve the dual goals of sterilization and depyrogenation.
Why Depyrogenate Glass When the CSP Can’t be Depyrogenated?
Pyrogens will naturally be part of your brew. Because we cannot heat the CSP up to extreme temperatures, when all is said and done there will be some pyrogens in the final product. Filtration may remove some of the pyrogens, but likely not all. In this scenario, why bother removing some pyrogens when we can’t remove them all?
Pyrogens are “any substance that can cause a fever”4. It is not a single, stray, pyrogen that causes this fever. Instead, it is a critical mass of pyrogens that begin to cause problems for the host4. If we have the option to remove, theoretically, 50% of the pyrogens in a CSP by depyrogenating the glassware, then we should do that.
Clean Everything Before Dry Heat Cycle
Before you run the dry heat cycle everything should be properly washed, rinsed, and capped with foil.
Wash: Use a phosphate based detergent such as “Alconox” to achieve lab quality clean. Phosphates are harsh. For small and medium size brews you may choose to use regular dish soap. When reusing glassware, regular dish soap does not remove old oils as well as Alconox. This may result in old oils getting baked onto the glass and essentially ruining the glass as it imparts debris into the brew.
Rinse: Rinse in distilled water. You should use a three stage rinse to ensure all soap is removed. Distilled water is essential to this process as we can’t have tap water or similar leaving minerals behind as the water evaporates out of the glass.
Cap: When glass comes out of the final rinse it should get a foil cap. You want to do this quickly enough that you minimize how long dust has to fall into the glass. Caps should be double layered and have a flute to allow steam to escape, but should be constructed in a way to not allow dust or anything else to fall in. It can be helpful if the caps on vials can be easily removed for a more graceful filling process. Use your head: steam has to escape, dust can’t be allowed in, and they need to be easily removed.
About Temperature Control
This is not baking cookies. When you put the items in the oven, first you have to get the items up to temperature. Once the items are at temperature, only then do you start a timer. You need a laser thermometer to verify the true temperature of your items. If you do not have a laser thermometer you need to get one. If you cannot get one I recommend you leave the items in the oven for at least 30 minutes to get them up to temperature, then after this theoretical 30 minutes of getting up to temp you can start your true timer.
You should use the laser thermometer multiple times during the sterilization/depyrogenation cycle to verify temperatures are holding correctly.
References
View the library page for access to some PDFs.
Footnotes
Glass Vials
Glass vials, responsible for holding your preparation, are important pieces of the equation.
Pre-sterilized
You’ll find that on many websites, including amazon and ebay, you can purchase pre-sterilized vials. This is a practice that I strongly recommend against. We don’t know anything about what these vials underwent before or during their sterilization process. We don’t know if they’re even actually sterile. Maybe they are technically sterile but weren’t washed properly, and so they have dust inside of them.
Pre-sterilized vials offer far too many uncontrollable variables. Please avoid these.
Pre-sterilized for the small guide
If you’re following my small guide, how to make one or two vials at a time, then I’d consider pre-sterilized vials less dangerous. This is for a couple reasons. 1) if something is wrong with the vials it’s only effecting one person, you, 2) you likely don’t have the resources or the equipment to sterilize your own vials, 3) your standards don’t have to be as high when you’re producing for just yourself.
If you want to +1 your setup though, this is definitely the thing to upgrade.
What size vials?
| 3mL vial | 5mL vial | 10mL vial | |
|---|---|---|---|
| 5mg/week & 20mg/mL concentration | 12 weeks | 20 weeks | 40 weeks |
| 5mg/week & 40mg/mL concentration | 24 weeks | 40 weeks | 80 weeks |
| 50mg/week & 200mg/mL concentration | 12 weeks | 20 weeks | 40 weeks |
If you stick with a 3mL vial, and the 20mg/mL concentration for E or the 200mg/mL concentration for T, then you’re left with a vial that will last about 12 weeks. This is a stark difference to most homebrewers who are selling vials that last 80 weeks.
Some folks who are homeless, and who have steady access to supply of fresh vials, will benefit from vials that last much less than this, anywhere from 1-4 weeks. This is due to them having a harder time keeping things clean and the cops messing with their possessions.
The FDA recommends multi-use vials expire after just 28 days, or 4 weeks1. This is unless the manufacturer can prove that the bacteriostatic agent (benzyl alcohol in our case) can preserve their preparation for longer than this time. Since being able to prove this is out of scope for home brewing, I tend to stay closer to the FDA’s guidance than to what is popular in the community.
Washing Vials
Vials need to be washed prior to use. This is to remove any debris or grime from the inside of the vial before sterilization.
Wash your vials in a phosphate detergent such as alconox. Use an appropriately sized bottle brush to clean the insides.
Rinse all vials in distilled water, I prefer a three stage rinse, then loosely cap with aluminum foil hats before their dry heat sterilization cycle. You should cap them before there’s a chance for dust to fall into the vial while the opening is exposed to the air. It should be capped in such a way as to allow steam from the distilled water to escape while not letting anything fall into the vial.
Sterilizing Vials
Vials can be dry heat sterilized in the oven, which can allow for them to be depyrogentated as well.
Depyrogenation temps2
| Temperature | Hold Time |
|---|---|
| 250°C / 482°F | 30 mins |
| 200°C / 392°F | 60 mins |
Reminder that this is how long you need to hold the item at the given temperature for, not how long you need to put it in the oven for. You should use an infrared thermometer to check to make sure your glassware is up to temp.
References
View the library page for access to some PDFs.
Footnotes
Guide Summary
Write yourself a full summary of the procedure before you do it. You’ll want a quick reference that you full own and understand on the day of your brew so that you’re not stumbling around reading the website to figure out what’s next.
Here’s an example copied from HRT Cat.
Example
Do not use this, make your own. There may be errors in this.
- Clear work area
- Sweep and mop
- Hang plastic sheets
- Install and turn on HEPA air purifier
- Sanitize work surface
- Clean floor once more
- Begin wearing shoe covers and garbs in clean room
- Preheat oven to 250°C
- Wash, rinse, and wrap items for depyrogenation
- Put in oven once pre-heated, set timer for 2 hours
- Prepare autoclave with distilled water
- Wash, rinse, and wrap items for sterilization
- Autoclave for 1 hour.
- Wipe down everything else with IPA
- Setup laminar flow hood, leave on
- Remove items from oven and autoclave, stage in clean room
- Inside flow hood, mix in beaker:
- ____mL MCT oil
- ____mL Benzyl Alcohol
- ____mL Benzyl Benzoate
- ____mg Estradiol Enanthate
- Filter into closed 100mL vials
- Dispense into vial, place stopper immediately. Repeat.
- Cap.
- Bubble point test
- Listed bubble point: ____psi
- Today’s air pressure: ____psi
- Starting air volume: ____mL
- Actual bubble point volume: ____mL
- Actual bubble point (calculator ): ____psi
- Full visual inspection
- Make a record
- Label vials
Hormone Esters
An ester is a slight variation on the chemical compound making up the hormone. These cause the hormones to have slightly different properties and half-lives, but are “considered to be bioidentical”1
Recommended Esters
Estradiol
For estradiol use Estradiol Enanthate (EEn). It has a slightly higher half life in the body than Estradiol Cypionate (EC), and a substantially higher half-life than Estradiol Valerate (EV)2. EEn is well suited to be injected every seven days.
Estradiol Undecylate (EU) has a much longer half life in the body than EEn, and can sometimes be preferable to some folks, as many people only inject it every other week. However, this is not a normal ester for DIY, and so most information out there doesn’t apply to EU. This makes EU a poor choice for people who need a weekly routine or for mutual aid orgs who can’t do a lot of education. EU is more ideal for trans feminine people who are heavy into DIY self-education and can confidentially manage their own meds.
Testosterone
Reminder that testosterone is a controlled substance in the United States and many other jurisdictions. This information is intended only for use in locations where testosterone is fully legal.
While both Testosterone Cypionate (TC) and Testosterone Enanthate (TEn) have good half lives in the body, TEn has a melting point that is so low it can convert back and forth between a solid and a liquid during shipping. This makes TC a more obvious choice so you don’t have to deal with this.
References
View the library page for access to some PDFs.
Footnotes
Instant Pot Sterilization
An Instant Pot is good for sterilization in what we call an “Emergency Field Medicine” type situation. This is not an autoclave. I think it’s fair to consider DIY production an “emergency” and so I support its use. Please upgrade to a gravity autoclave if you’re able.
“Only the Instant Pot brand pressure cooker was able to inactivate G. stearothermophilus endospores, which indicated that it would be the most appropriate choice for a laboratory pressure cooker.”1
How To
Assuming your Instant Pot reaches 115-118°C at 10.2-11.6 psi or greater:
Run your sterilization cycle for at least 150 minutes.
This is true of the IP-DUO80 model2, and a few others they make. They may make other models with different ratings, so check your manual. Greater ratings are encouraged, though lesser ratings are prohibited.
Instant Pot Max Pressure Mode
Some instant pots have a “max pressure” mode, which may or may not get up to 15psi. What’s important to note is that instant pots do not achieve stable pressure or temperature. They phase in and out of various pressures, with their max rated pressure/temperature. You can not use an instant pot at “max” pressure as if it is a standard autoclave. It is not an autoclave.
I highly recommend that if you’re using max pressure mode that you stick with the research that is linked on this page, and still use the instant pot for at least 150 minutes. There is no research that supports a lesser time.
Don’t follow Instant Pot’s Sterilization Program
That program is designed for stuff like canning and cleaning. It was not designed to make injectables with.
Consider Upgrading
An upgrade may be within your price range. Look into stove top autoclaves. They leave less moisture behind and we can be more confident that they sterilized our items.
References
Page based on work from HRT Cat
View the library page for access to some PDFs.
Footnotes
Laminar Flow Hood
Working in a laminar flow hood is an entire skill. You must handle things and move your hands in very particular ways. It is beyond the scope of this guide to be able to teach you this skill.
I highly recommend you invest a significant amount of time learning how to work in laminar flow through YouTube tutorials. Try to prioritize videos from pharmaceutical technicians, as they often have a higher standard than mycologists.
Long Term Sterility
You should do as much as possible to ensure your vials are sterile during your brew process. But how can you ensure that they stay sterile once you’re no longer brewing and/or they’re no longer in your hands?
I’d like to present the swiss cheese diagram that became popular during early covid.
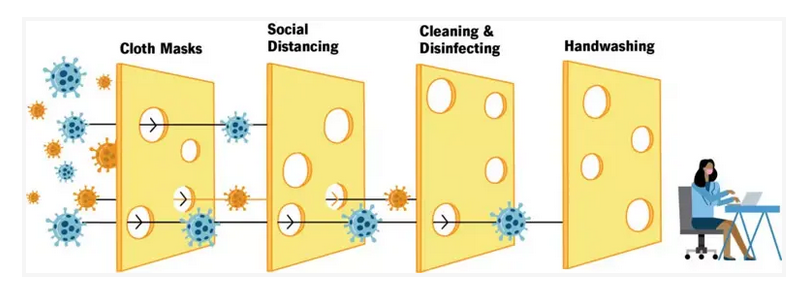
This diagram was used to illustrate how a single strategy was not adequate to stop the spread of the pandemic. You can see how each layer of swiss cheese blocks some of the virus particles, but not all of it. According to the diagram, cloth masks helped reduce the spread partially, but we also needed to rely on social distancing, then cleaning/disinfecting, then finally hand washing. If you’re lucky and none of the holes line up then you’ll stop the spread of covid.
While a more modern version of this diagram might have some key updates, my point stands. Sterility does not come from one single place. Sterility comes from lining up all the pieces just right.
One of these pieces, then, is maintaining sterility after a vial is punctured. How can the homebrewer be involved in that process?
Controlling Long Term Sterility by Controlling Vial Size and Concentration
The current norm in the homebrew scene is to make 10mL vials of estradiol at a 40mg/mL concentration. If someone is using an average dose of 5mg, and assuming no loss to dead space, that vial will last someone 80 doses. That’s around 18 months or 560 days.
The United States Pharmacopeia (USP) is handbook published by a 200 year old non-profit who’s sole purpose is to publish information about pharmaceuticals. This book is the standard for all things pharmaceutical. USP chapter 797 recommends that once a multi-use vial is punctured, that it be discarded within 28 days1. The DIY community uses vials for 20 times longer what is recommended by the leading experts in the United States.
These 560 days give vials far too much time to:
- core
- become contaminated
- through coring
- though being drawn from too much
- oxidize
- ingredient breakdown
Instead I recommend making vials targeted to last about 3 months, or, 84 days.
Vial Intended Duration of Use
| USP Recommendation | 28 days |
|---|---|
| DIY Community Norm | 560 days |
| HRT Mom middle ground | 84 days |
Recommended Size and Concentration of Vials
| Testosterone | Estradiol |
|---|---|
| 3mL vial, 200mg/mL | 3mL vial, 20mg/mL |
Dosed at 50mg per week or 5mg per week respectively, these vials will last about 3 months.
If People 100% Need a Year Supply Vial
You can provide them with 4 of these 3mL vials. If someone can store a single vial for a year, the can surely store 4 of them. This a severe matter of safety. We cannot understand the effects of people dipping into the same vials long term like this. We are fortunate that HRT is studied in medical settings to help us understand it’s usage. The application of using the same vial for a year+ is fully outside the scope of medical understanding. We can choose to just play it safe here with almost no drawback.
Please, please do not provide people with vials that are intended to last this long.
Teach Proper Vial Usage
Once the vial is out of your hands, there’s only so much you can do to ensure it’s being used properly. Community members who are using your vials should be doing a few key things:
- Storing at a stable, room temperature
- Storing in the dark
- Always cleaning the stopper with an alcohol swab before drawing
- Using a thin gauge drawing needle (with MCT you can get away with 25g/27g)
- Inspecting for contamination before use
It may be out of your hands to tell each community member who uses your vials this information personally. However you can provide educational material that are intended to go with the vials. This can be a small leaflet, zine, a url on the vial, or even a QR code on the vial. Try your best to get people the info they need to use the vial safely.
References
View the library page for access to some PDFs.
Footnotes
-
USP 797, 2024 edition ↩
Moist Heat Autoclave Sterilization
Please see the pages for
Personal Protective Equipment (PPE)
Wear PPE at all times when brewing. This is to protect you from side-effects of skin contact with the brew or side-effects from any type of inhalation. This is also to protect the brew from coming into contact with things like dead skin cells, your breath, hair, fibers from clothes, bacteria shedding from you/your skin, etc.
What your should wear
- Gloves
- Mask
- Hair net
- Beard net
- Full tyvek suit with cinching wrist wraps
- Shoe covers
This may seem overkill, but I promise it’s not. This is necessary for protecting you and the compounded preparation.
Where to wear
You should have an established “brew area” where you’re always garbed up. Create a marcation line where you do not cross ungarbed/garbed.
Learn more
Check out the page for aseptic technique that has lots of relevant information here linked in some videos.
General tips
- Learn how to properly remove gloves
- No phones, food, drink, etc in the brew area
Recipe calculator
Important Info! How to calculate and mix
After significant experimentation and research it has become clear that you cannot reliably estimate how much carrier oil to add. The displacement of the API, BB, and BA is not consistent enough to make this determination. To hit your target volume you should be working in a graduated beaker, and then
- Add API
- Add BB
- Add carrier oil to be about 10% shy of your target brew volume
You’ll then heat it to not more than 100F/40C and mix. After it’s fully mixed let it fully cool. Fully.
- Add BA (cannot be hot! do not get BA hot!)
- Add carrier oil to target brew volume
What this process does is allow for us to have the exact ratios we’ve calculated for for our API and other inactives. We let the carrier oil get us to the exact volume we need to be at which assures that all our other ingredients are in correct ratio to each other.
Rubber Stoppers
Stoppers are the thing that closes a vial. Often made of butyl rubber, you push a needle through the stopper to draw out your preparation before injecting it. When making vials, a cap is crimped on top of a stopper.
Two important points
-
Silicone stoppers are NOT compatible with benzyl alcohol (BA), an essential component of your homebrew. Benzyl alcohol is studied to be able to pass through, and evaporate out of, silicone. Benzyl alcohol is present in the solution to prevent the proliferation of bacteria, it is not optional. Taking risks surrounding benzyl alcohol is not worth it.
-
Butyl rubber stoppers are NOT compatible with oven sterilization. You cannot sterilize them in the oven at all, either before you assemble the vials or as part of a complete, sealed vial. Butyl rubber will begin to off-gas and therefore leech harmful chemicals into your preparation. Butyl rubber must be sterilized in the autoclave.
Off Gassing
In my own experiments, I have discovered that at any valid sterilization temperature, the butyl rubber stoppers begin to breakdown in the heat. This one time it released a horrific off-gassing into my space, where everything smelled of burning rubber. This was at the lowest, temperature, 140°C/284°F. Now, imagine that off-gassing is happening, but the rubber stoppers are fully capped and enclosed. That gas is leaving the stopper and coming into contact with the HRT. It’s impossible to know if leeching takes place. I’m certainly not going to inject something that underwent that process. I also suspect the butyl rubber that’s been overheated cores more easily, but I have no data to prove this.
Butyl rubber cannot be replaced with silicone due to the documented ability for benzyl alcohol to pass through and evaporate out of silicone tubing.1
Notes and Sources
View the library page for access to some PDFs.
- BB + Silicone are a bad match
- BA evaporates through silicone barriers
- Silicone absorbs MCT oil (no sources cited)
Footnotes
Sterility Assurance Testing
This page is just notes. If you desire to perform sterility assurance testing you will likely need to perform additional research. Take a look at the references on the bottom of the page.
Procedural Information
Make FTM tubes
Using 3mL vials and 15mL test tubes.
- Mix the FTM broth with distilled water as per the package instructions
- Add polysorbate 80 at a concentration of 40mL/L
- Add 13.5mL to test tubes
- Autoclave test tubes
Add the CSP
- Choose the number of vials to test.
- Under laminar flow add 1.5mL from each vial to a tube
- Seal.
Incubate
You will likely be incubating 4-10 tubes.
Tubes should be incubated at 30-35°C (86-95°F) for 14 days1.
Observe
Cloudy tubes mean contam?
Sterility Assurance Testing Notes Below
We can test the sterility of our finished product if we have some special supplies and tools. For this tek we’re working with two different growth mediums as recommended by USP 71 and the book “Compounding Sterile Preparations.” These are Tryptic Soy Agar (TSA) and Fluid Thioglycollate Medium (FTM)2.
Notes Below
What tube size should we be using?
Tube contains:
- 1.5-5mL of CSP (50% of vial)
- 13.5-45mL of FTM (with polysorbate 80)
the volume of the product is not more than 10% of the volume of the medium
For testing 3mL vials, we need 15mL tubes.
USP 71
How many vials to test?
| Total vials produced | Vials to test |
|---|---|
| Less than 100 | 10% or 4 vials, whichever is more |
| 100-500 | 10 vials |
| 500+ | 2% or 20 vials, whichever is less |
From USP 71
How to neutralize the BA?
If the product to be examined has antimicrobial activity, carry out the test after neutralizing this with a suitable neutralizing substance or by dilution in a sufficient quantity of culture medium1
BA is neutralized by Polysorbate 80 at a concentration of 40mL/L3
Testing Oily Liquids?
Use media to which have been added a suitable emulsifying agent at a concentration shown to be appropriate in the Method Suitability Test, for example polysorbate 80 at a concentration of 10 g per L.1
Is TSA even needed aside from fingertip tests? Can just stick with FTM solely?
How much P80 to add?
- 40mL per L for neutralizing BA
- 10g per L for emulsifying
Which is greater? P80 is 1.06g/mL
10g is 9.43mL.
Verifying Your Test is Suitable
After transferring the contents of the container or containers to be tested… to the culture medium, add an inoculum of a small number of viable microorganisms (not more than 100 cfu) to the medium.
In both cases use the same microorganisms as those described above under Growth Promotion Test of Aerobes, Anaerobes, and Fungi. Perform a growth promotion test as a positive control. Incubate all the containers containing medium for not more than 5 days.
If clearly visible growth of microorganisms is obtained after the incubation, visually comparable to that in the control vessel without product, either the product possesses no antimicrobial activity under the conditions of the test or such activity has been satisfactorily eliminated. The test for sterility may then be carried out without further modification.
If clearly visible growth is not obtained in the presence of the product to be tested, visually comparable to that in the control vessels without product, the product possesses antimicrobial activity that has not been satisfactorily eliminated under the conditions of the test. Modify the conditions in order to eliminate the antimicrobial activity, and repeat the Method Suitability Test.
This method suitability is performed (a) when the test for sterility has to be carried out on a new product; and (b) whenever there is a change in the experimental conditions of the test. The method suitability may be performed simultaneously with the Test for Sterility of the Product to be Examined.1
Since we don’t have access to strains of bacteria aside from what we can just pickup in the kitchen sink, we need to adapt this test for home use.
Supplies
- Laminar flow hood
- Incubator
- Autoclave
- Media bottles
- Tryptic Soy Agar plates
- Fluid Thioglycollate Medium tubes
- Polysorbate 80 as an emulsifier
You can potentially substitute your laminar flow hood here for a still air box, but your results won’t be as consistent or trustworthy.
How to make TSA plates
You can make TSA with neutralizers if you’d like to perform fingertip testing4, a way of verifying how solid your personal aseptic technique is. Do not use neutralizers otherwise.
- Sterilize empty agar plates
- Mix the TSA powder with distilled water according to the TSA package.
- Autoclave in a media bottle
- When TSA cools to a handling temperature, but before it solidifies, pour the liquid TSA into agar plates under a laminar flow hood and immediately cover.
- You can optionally add a small piece of tape to keep them shut
- Let cool fully before use
If you’re using this right away, make sure to set a couple aside to ensure that they were sterilized correctly and aren’t growing bacteria you didn’t mean to introduce.
Using TSA plates
TSA plates should be incubated at 20-35°C (68-95°F) for 14 days5.
Using FTM tubes
Heat in a water bath prior to use.1
FTM tubes should be incubated at 30-35°C (86-95°F) for 14 days1.
How much product to test
The minimum volume of each CSP [compounded sterile preparation] to be tested is dependent on the volume of the final product. If the product is <1 mL, the entire volume must be tested. If 1-40 mL, then half the total volume is tested. If 40-100 mL, then 20 mL is tested. If the volume is >100 mL, then 10% of the volume is tested (but at least 20 mL).6
If the individual containers (for end-user use) have between 1-40mL in them (like what we’re doing here on HRT Mom), then sterility testing is done on 50% of the volume of the containers7
“the product is not more than 10% of the volume of the medium”7
References
Some information on this page comes from HRT Cat.
View the library page for access to some PDFs.
Footnotes
Sterilization Temperatures
In depth information lives on the pages for the individual methods:
Dry Heat Sterilization Temperatures1
| Temperature | Time |
|---|---|
| 170°C/338°F | 60 mins |
| 160°C/320°F | 120 mins |
| 150°C/302°F | 150 mins |
Dry Heat Depyrogenation Temperatures
| Temperature | Time |
|---|---|
| 250°C/482°F | 30 mins1 |
| 200°C/392°F | 60 mins2 |
Moist Heat Autoclave Sterilization Parameters3
| Temperature | 121°C |
| Pressure | 15 psi |
| Time | 20-60 minutes* |
*You’re supposed to choose a time that you can verify is correctly sterilizing your product. Since that’s typically out of scope for DIY operations, you may choose to sterilize for the maximum recommended time. The CDC recommends 30 minutes4.
Instant Pot Sterilization Parameters5
| Setting | Pressure cook high or max |
| Time | 150 minutes |
References
View the library page for access to some PDFs.
Footnotes
-
USP 797 section 10.3, 2024 edition ↩
-
Assessment and verification of commercially available pressure cookers for laboratory sterilization ↩
Sterilization Theory
Sterilization requires a set of knowledge specifically catered to the compounded product that you’re working with. Sterilization is not so cut and dry that every solution works for everything.
Our CSP (compounded sterile preparation):
-
Is a non-aqueous liquid (it’s not water, it’s oil)
-
Starts with non-sterile components
-
Cannot endure dry heat sterilization (due to the benzyl alcohol1 and rubber stoppers2)
-
Cannot be sterilized by steam (it’s non-aqueous and due to the benzyl alcohol1)
- USP 797 says: “Steam sterilization is not an option… if there is insufficient moisture to sterilize the CSP within the final, sealed, container closure system”3.
-
Can be filtered
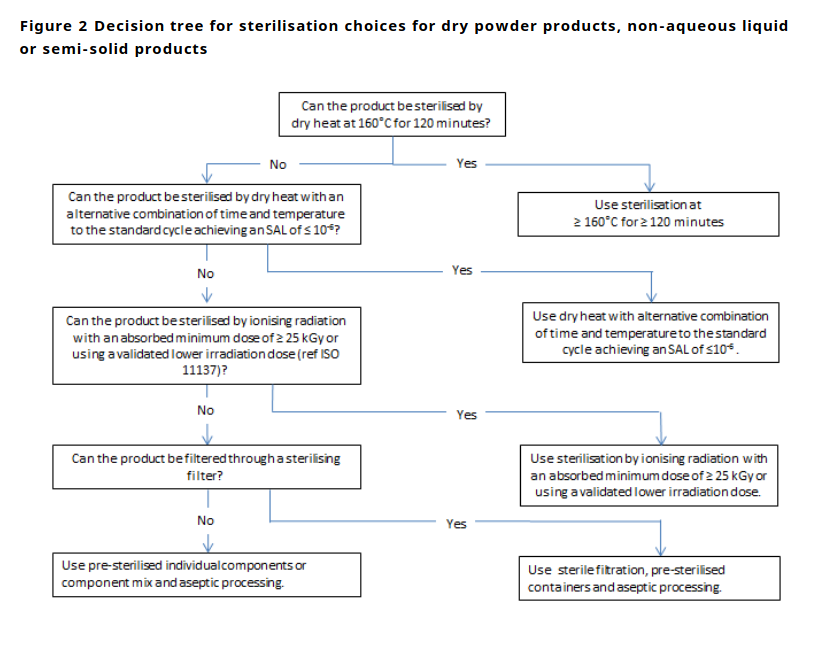
Filtration and Aseptic Technique
For the above reasons we are going to need to sterilize our compounded preparation using solely filtration and aseptic technique.
Why doesn’t dry heat sterilization work? (Ovens)
Dry heat sterilization generally involves heating something up to 160°C for at least 120 minutes. Any time there is no steam and pressure contact being made with the subject of the sterilization, it’s considered “dry heat.” A glass wall between the steam and the contents of a vial make it’s autoclaving still technically “dry heat,” as the steam does not make contact with the contents of the vial.
You cannot dry heat sterilize finished vials.
Reason 1: benzyl alcohol, the vital preservative in the vial, can break down, release a toxic byproduct, and evaporate with heat (more info)
Reason 2: butyl rubber stoppers begin to break down and off-gas (more info)
Reason 3: benzyl benzoate may break down with heat
Reason 4: while anecdotally the hormone may remain stable with high heat, there is no scientific evidence to support this.
Why doesn’t steam sterilization (autoclaving) work?
Reason 1: same as reason 1 above, benzyl alcohol can’t handle the heat. (more info)
Reason 2: for steam sterilization to be effective, the product that is meant to be sterilized must come into contact with steam, not the container or vial, but the product itself5,6,7.
Reason 2a: This isn’t true IF the contents of the vial are water based, that way the contents can create their own steam and pressure system as they heat up. However, our CSP is oil based, so this won’t work.
USP 797 says: “Steam sterilization is not an option… if there is insufficient moisture to sterilize the CSP within the final, sealed, container closure system”3.
”I think you’re wrong, it’s about the energy transferred to the glass vial by the steam”
No. It’s true that the energy transferred to the glass will happen more quickly in the steam than in dry heat, but that energy transfer still maxes out at 121C, far below what’s needed when there’s no steam/pressure making contact with the microbes. Without the steam making direct contact to the microbes in question, this is just heating something up really fast, the steam isn’t doing anything else.
Filtration & Aseptic Technique
Filtration and aseptic technique is the only viable combination that can get us safely sterilized vials. Be wary of anyone who is teaching how to homebrew HRT and does not understand these concepts fully and clearly. There is no benchmark that someone has to hit to be able to write about and teach this stuff online. There are lots of highly unqualified people out there giving bad advice. 99% of advice I find online about how to homebrew is incorrect.
References
Some sources pulled from HRT Cat
View the library page for access to some PDFs.
Footnotes
-
More research about benzyl alcohol here ↩ ↩2
-
More research about rubber stopper here ↩
-
Guideline on the sterilisation of the medicinal product, active substance, exicpient and primary container ↩
-
Compounding Sterile Preparations, pg 254 ↩
-
Steam Sterilization vs. Dry Heat Sterilization For Medical Devices & Products ↩
-
Steam Sterilization Principles & Common Mistakes Using Autoclaves ↩
Still Air Box
A still air box is basically just an upside-down large clear tupperware container with two arm holes cut in it. The idea is that if you clean the box really well, set it up, put all your stuff in it, and then just let it sit, that the majority of bacteria that’s floating around the air inside the box will settle to the floor of the box. Then, when you stick your arms in the box to work, you’re working in slightly cleaner air than you would be outside of the box.
Look up some YouTube tutorials on how to build a box and how to use it. The mycology community is your friend with this one.
Do not build a box that has gloves taped to the inside of it. While at first it seems like this would keep the box from being exposed to new air when you insert your arms, the reality is that because the box isn’t sterile on the inside to begin with, that the gloves end up facilitating a bunch of air currents inside the box, and stirring around a lot more bacteria than it would otherwise.
The still air box can be used for the small guide (optional) or the medium guide (required). It cannot be used for the large guide.
Syringe Filters
Use 0.22μm sterile PTFE syringe filters
You can potentially replace the PTFE material with Nylon, however there appears to be less data indicating safety, and this should require more research.
PTFE is safe with oil, benzyl alcohol, and benzyl benzoate1 2.
Details (for sterilization)
- Pore Size: 0.22μm (this size is required for sterilization)
- Sterility: Use pre-packaged, sterile filters.
- Size: if you’re filtering 1-10mL, use a 13mm filter. 10-100mL use a 25mm filter3. 100m-250mL use a 33mm filter4. Larger is generally easier to push though.
- Filter material: Polytetrafluoroethylene (PTFE). Nylon filters may work, but require more research to verify.
- Hydrophobic or Hydrophilic: Inconsequential for an oil-based solution.
Details (for pre-filtration)
- Pore Size: 0.45μm
- Sterility: not required
- Size: if you’re filtering 1-10mL, use a 13mm filter. 10-100mL use a 25mm filter3. 100m-250mL use a 33mm filter4. Larger is generally easier to push though.
- Filter material: Polytetrafluoroethylene (PTFE). Nylon filters may work, but require more research to verify.
- Hydrophobic or Hydrophilic: Inconsequential for an oil-based solution.
Don’t use PVDF of PAS
Benzyl benzoate, an ingredient in the brew, can cause PVDF filters to dissolve. This could have potential side effects such as filters breaking or PVDF leeching into the filtered solution. There is minimal data to support whether PVDF is safe, so in this case it’s best to air on the side of caution5.
Bubble Point
Many, but not all, filters will list a bubble point or “max burst pressure”. Check or confirm this bubble point by testing the bubble point of your filters with a sample of your solution. Bubble points can change when the filters are pre-wetted with different solutions, so always check with your actual brew.
Read more about bubble point testing here.
Cheap Filters vs High Quality Filters
There are many filters available in small 10 packs on websites like Amazon. While these filters are economical they are of substantially lower quality.
| Amazon/eBay/etc Filters | High Quality Filters | |
|---|---|---|
| Cost per | $1.30 each | $2.00 each |
| Pack Size | 10 | 100 |
| Total Cost | $13 | $200 |
| Bubble Point | Variable 30-45psi | Consistent 50psi |
| Filter Speed | 80-120 seconds per 1mL | 15-30 seconds per 1mL |
If you can afford the upfront cost of higher quality filters they make a massive difference. This makes less sense for those following the small or medium guides.
Opinion: I have a theory about these filters which I can’t prove without a microscope or something. Lower Quality (LQ) filters likely have inconsistent pore sizes on the filter surface + less stable filter surface, while Higher Quality (HQ) filters likely have an extremely consistent pores on the filter surface with strong stability. I believe this for a few reasons. First, from a purely economical standpoint, an Amazon seller has less incentive to make a high quality product compared to a company who’s whole business is manufacturing filters. Second is the variable bubble point. On an LQ filter, I might get a bubble point of 45psi, and then push 20mL of product though it, then suddenly start getting 30psi bubble point. To me this indicates that it degraded while it was being used. HQ filters on the other hand will always come back with a consistent 50psi when I’m using them in a normal way. Finally, during the bubble point test itself, LQ filters put off a stream of bubbles about 0.5mm in size, where as HQ filters are putting out something more akin to foam, which is bubbles more on the scale of 0.05mm each. Why would LQ filters release air bubbles almost 10x the size of HQ filters? To me this points back to the quality of the filter itself, the HQ filters may have more consistent pore sizes and may be letting smaller pockets of air through at once.
Compatibility Charts
https://www.restek.com/globalassets/pdfs/literature/gnts2123-unv.pdf
https://scientificfilters.com/membrane-Filter-chemical-compatibility-chart/
https://www.ddbiolab.com/data/pdf_guides/en/Tableau_de_compatibilite_chimique_Whatman.pdf
https://www.astisensor.com/KYNAR_PVDF_Chemical_Compatibility_Resistance_Chart.pdf
https://www.calpaclab.com/teflon-ptfe-compatibility/
https://www.growinglabs.com/pages/syringe-filter-solvent-compatibility
References
Page based on work from HRT Cat
View the library page for access to some PDFs.
Footnotes
Brew HRT Topicals
Brewing topicals isn’t my specialty, but I have some resources I can point you towards:
Resources
I do not endorse the following, just linking them. Do your own research to determine if you’re getting good info or not.
- r/estrogel - Discussion board for getting help brewing topicals.
- r/estrogel’s Wiki - dosing, recipes, sourcing, and more
- Boobs Not Bombs - a large scale guide for brewing for you and your community
Small Scale Guide: Preliminaries
Brew Estradiol or Testosterone
Unlicensed production of testosterone may be illegal in your region.
Warning
This guide creates injectables. This injectable is designed to go into your body, bypassing the wonderful filtration system of your digestive organs. Injectable preparations are inherently more dangerous than topicals or orals. Do not skip steps. Do not skimp on prices. You want to do this, so do it right, the first time.
Please contemplate if you’re capable of doing this process correctly before beginning.
Scale
This guide is designed to create roughly 10mL of your target preparation.
It can do more but it’s stretching the capabilities of the equipment and you start encountering more safety issues and considerations. Consider upgrading to the medium guide if you need more than a couple small vials for personal use.
Bare-Bones Guide
This guide is completely bare-bones. I’ve stripped out everything that’s not completely essential. This is because this is a harm-reduction based guide that’s meant to make your personal homebrewing as easy and accessible as possible while still staying safe.
You can up your game by reading the medium scale guide and taking tools and methodologies from there.
Other Guides
I don’t recommend any other guides for this procedure. There’s a lot of bad info out there.
DIY vials are a science, not an art. While there will always be a difference in opinion, I know we can collectively step up our game. Just because people “aren’t getting hurt” by the current state of DIY doesn’t mean it’s adequate. I believe that in some circumstances there could be longterm health consequences to poor technique.
Small Guide Contents
- Defining and gathering supplies
- Building a work area
- Preparing materials
- Mixing preparation
- Filtering into small vials you’ll later inject from
- Using bubble point tests to ensure filter integrity
- Visual exam
Pre-Brew Education
Please read up before beginning this process
- Read this whole guide start to finish
- Make a list of how this guide is different from what you’ve done in the past
- Explore the items in “Topics” area of the sidebar to improve your knowledge
Science-Mind
When you homebrew you’re doing something that is highly regulated and whose secrets are highly guarded. It’s also pretty dangerous to cook something in your kitchen and then to inject it into your own body. You’ll be best served if you adopt a science mindset as you move forward. Ask as many questions as you can about why things are they way they are. Ask if things are safe or not. Ask why we know if they’re safe or not. Keep this up and never stop.
You should be thrilled to learn that there’s a better way to do something. Treat every failure as a success because your set of knowledge just got broader. Be cautious of people with homebrew knowledge who are highly defensive and who have no data to back up why what they do is “safe.”
Accidental skin contact
Be aware that gloves should be worn while following this guide. All people can have their hormone profile interfered with if they make accidental skin contact with what they’re brewing. If you are a person who has hormone cycles, or a person who is on testosterone to suppress those cycles, you may notice that accidental skin contact is detrimental to that cycle.
You will come into contact with this preparation, and you need to have PPE protecting you.
A lot can go wrong here, I’ve seen it first hand. Protect yourself.
Create a guide summary
Preparing for the day of your brew, you should have a personal summary of this guide written out so you don’t have to refer to a website constantly.
Notes of safety
Some safety decisions have to be made.
Most brew guides will direct you to make 10mL vials at a high concentration such as 40mg/mL. While this is super convenient for making a single vial last you around 80 weeks, there are some large safety concerns with this.
The FDA recommends that once you puncture a vial, that you discard it after a mere 28 days. A deviation of this size is too large to ignore. While we know that those in the DIY community seem to have perfectly fine results from doing this, we don’t know if it’s actually safe or not. Even with the best technique, over time you will be degrading the stopper and introducing bacteria into the vial.
80 weeks feels excessive to me for this. If you, instead, make a 5ml vial of 20mg/mL concentration, you’re looking at a vial that lasts you around 20 weeks. While 20 weeks is still way over the 28 day threshold thats recommended, it’s at least a bit saner of a stretch.
I prefer vials that are 3mL and 20mg/mL concentration, and thus last around 12 weeks.
Figure out what makes sense for you.
Decide on your recipe
Head over the recipe calculator and calculate your recipe. For this specific methodology I’d suggest you make 1 or 2 5mL vials of 20mg/mL Estradiol or 200mg/mL Testosterone. At average dosing, a 5mL vial will last you about 5 months.
Brew at least an extra 5mL more than you plan on dispensing into vials to account for loss to the filter etc.
Small Guide: Supplies
Active Pharmecutical Ingredient (API)
Other Excipients
Vials
- Pre-sterilized 3/5/10mL Vials (Please get these from a reputable vendor, not amazon/ebay).
Tools
- Oven
- Work surface
- Milligram scale
- Glass stirring rod (use a metal spoon or butter knife in a pinch)
- Baking dish
- 50mL graduated beaker (optional but very helpful)
OR
- Pyrex beakers of appropriate size for mixing. Any glass that can be oven sterilized works too (many drinking glasses will break in the oven, but you might have better luck with a glass jar for pickling)
Disposables
- 18g sterile luer lock needles (optional, used for drawing ingredients)
- 27g sterile luer lock needles (for filtering into sterile vial)
- 3mL sterile luer lock syringes
- 10mL sterile luer lock syringes
- Sterile 0.22μm PTFE syringe filters
- Isopropyl alcohol 70% (IPA) (buy exactly 70%)
- Disinfecting hand soap
- Paper towels
- Aluminum foil
Personal Protective Equipment (PPE)
- Latex/nitrile gloves
Small Guide: Supplies
Identifying and Creating a Work Area
Your work area should be on a table or counter top, ideally not wood, that is away from carpet and pets.
If you can’t get away from carpet, then you need to vacuum the day before brewing very, very well.
If you only have a wood work surface, put down some plastic sheeting or something to work on top of to protect the wood from the brew.
When you’re working you should not have any fans running unless they are part of a HEPA filtration system.
Don’t brew next to an open window, or next to a window with the blinds open (don’t want the neighbors to see what you’re doing).
Fully clear off the work surface and clean it really well. Only add the items back to the work surface that you’re going to need for your brew. Everything else can stay elsewhere for now.
Wash and Sterilize Tools and Vials
Your mixing glass and your glass stir rod are going to come into contact with the brew. Let’s sterilize them first so that we can eliminate bacteria in the mix.
- Wash both items very well with dish soap
- Rinse with clean water or distilled
- No need to dry
- Cover the opening of the mixing glass/beaker/jar with aluminum foil, giving it a little hat. Make sure to not cramp down too tight with the foil as we want the steam to be able to escape
- Similarly, wrap the stir rod in foil, accounting for the fact that you want moisture to be able to escape
Home ovens kick around a lot of oil when they get turned on. The foil is partially to prevent any dirt/oil/particles from your oven from getting on your brew supplies.
Pre-heat your oven to as high as it goes, but no higher than 500°F/260°C.
Once it’s preheated, place the baking sheet in the oven and cook for the following times according to the temperature you’re oven is able to achieve:
| Temperature | Time |
|---|---|
| 500°F/260°C | 60 mins |
| 400°F/200°C | 90 mins |
Remove from the oven and let cool to room temperature. Don’t unwrap the items.
Small Guide: Mix
Recipe
Go to the recipe calculator page to determine what your recipe is.
The calculator will not tell you how much oil to add. This is intentional, however it may cause problems for your small scale brew if you don’t have a scientific beaker with measurements on the side. If you do have a small graduated beaker, use that and follow the mixing guide on the recipe calculator page. Otherwise read below.
Mix Without a Graduated Beaker
You can work in a still air box if possible, but it’s not strictly required for the small guide.
Instead of using a graduated beaker, add the API and BB to your mixing container. Whatever volume of BB you added, add the same volume of your oil. Write down how much you’re adding in order to keep track of what’s what. Now mix it up real good until the API is dissolved. If the API is refusing to dissolve fully after 5 minutes of stirring, go ahead and add a little more oil (keeping track of how much you’re adding).
Now you can draw your whole preparation up into a syringe or two. Use these to measure what the total volume of your preparation is. When you used the calculator you said what volume you are trying to brew, so this is the number your want to hit as a total volume. Add your benzyl alcohol, and then add the amount of oil to your mixing container that is needed to achieve this TOTAL volume.
Example:
I’m brewing 25mL of 20mg/mL Estradiol at a theorized 100% purity.
The recipe calculator tells me to use:
- 0.5g Estradiol Enanthate
- 5mL Benzyl Benzoate
- 0.5mL Benzyl Alcohol
- Carrier oil fill to 25mL
So I add 0.5g of estradiol enanthate, 5mL of benzyl benzoate, and 5mL of oil to my mixing glass.
I mix this for five minutes. The estradiol isn’t fully dissolved, so I add another 5mL of oil. The estradiol dissolves fully.
I suck up the preparation with two different 10mL syringes. I see that the total volume of the preparation is 19.5mL.
I add 0.5mL of benzyl alcohol to the mixing glass.
This brings the total volume up to 20mL. My target volume was 25mL. This means I need to add an additional 5mL of oil to the mixing glass.
I add all the preparation from my syringes back to the mixing glass and stir well. Mixing complete.
Cover the Preparation
As soon as the preparation is properly mixed cover it with aluminum foil to prevent any dust or bacteria from falling in.
”Why is the Mixing So Complicated?”
The mixing is complicated because it’s difficult to determine exactly how much volume your API displaces. Using basic density measurements for the API proves to be ineffective with this. This problem is sidestepped using the above method.
Filter & Dispense
Preparing
In your work area you have
- Mixed preparation
- 10mL syringes
- 2 27g needles (wrapped)
- a 18g needle (wrapped) (27g okay)
- a sterile 0.22 PTFE syringe filter
- Pre-sterilized and sealed vials (3mL, 5mL, or 10mL)
- Alcohol swabs
- Gloves (on your hands)
Filter & Dispense
- Attach the 18g needle to the syringe
- Draw up from your preparation however much you want to dispense
- Remove the needle
- Attach the filter to syringe
- Attach the 27g needle to the filter
- Alcohol swab the rubber stopper of the sterile vial
- Take the spare 27g needle and pierce the vial, this is a vent to allow air to escape
- Pierce the vial with the syringe/filter/needle
- Push down on the plunger to begin filtration
- Filtration should happen at a slow drip (approx 0.5-2mL per minute)
- Remove both needles when vial is full/filtration finished
If you’re able, leave some air in the syringe when you draw up your preparation. This will make pushing the syringe easier. See the hand filtration tek for more tips.
Verify Filter Integrity
Now we need to make sure the filter didn’t break when you were filtering. A filter breaking is invisible, so the only way to know if it broke is to use the bubble point test.
The test might feel a little complicated but it’s really important you do it correctly. Read the linked page to learn and perform this step.
Final
Inspect
Perform a visual inspection of your vials. Hold one up to the light and look really closely at the liquid inside. Slowly rotate it and move it around. You’re looking for any small particles. You may see tiny tiny air bubbles, these will dissipate with time. If you see anything in the vial then your vial is contaminated. It will need to be refiltered into a fresh, sterile vial.
Batch Log
Write down what you did so that if any problems come up you have hard data to reflect back on. This includes how you mixed, how you prepared, etc.
Label
For your safety and for safety in emergency situations, it would be helpful to have a label on your vial. This should state:
- Active ingredients
- Concentration (e.g. 20mg/mL)
- Inactive ingredients
This can even be hand written on the sticky portion of a sticky note.
You’re done!
Good job. This whole ordeal isn’t exactly easy. Consider double checking you did everything right and then enjoy your hard work!
Medium Scale Guide: Preliminaries
Brew Estradiol or Testosterone
Note: Unlicenced manufactuere of testosterone is illegal in the United States and possibly other juristictions. This guide is only for use in juristictions where its use is allowed, or for use with legal substances.
Warning
This guide creates injectables. This injectable is designed to go into your body, bypassing the wonderful filtration system of your digestive organs. Injectable preparations are inherently more dangerous than topicals or orals. Do not skip steps. Do not skimp on prices. You want to do this, so do it right, the first time.
Please contemplate if you’re capable of doing this process correctly before beginning.
Scale
This guide is designed to create roughly 100mL of your target preparation.
It can do more but it’s stretching the capabilites of the equipment and it takes too long. Consider upgrading to the large guide.
Other Guides
This guide is based off of the work of HRT Cat, but makes some needed changes. Thank you to them for the large amount of research they’ve done on this topic. They seem to have abandonded the project so this guide is advancing forward.
There are a number of other guides on the internet for how to do this. I’ve seen guides from HRT Cafe, Tyger, Lily from Oto, Lena (Ultimate DIY Guide), Noir Labs, and “Anonymous.” The steroids community also has a number of guides available.
Speaking broadly, these guides are all advising dangerous practices, some more than others. I strongly advise reading up on the methodology here and educating yourself about why it is the way it is. I will be citing my sources and explaining as much as I can along the way.
DIY vials are a science, not an art. While there will always be a difference in opinion, I know we can collectively step up our game. Just because people “aren’t getting hurt” by the current state of DIY doesn’t mean it’s adequate. I believe that in some circumstances there could be longterm health consequences to poor technique.
Medium Guide Contents
- Defining and gathering supplies
- Building a work area
- Preparing materilas (sterilizing)
- Working in a still air box
- Using bubble point tests to ensure filter integrity
- Mixing preparation, and filtering into 100mL vials
- Dispensing into smaller vials
- Capping
- Visual exam
Pre-Brew Education
Please read up before beginning this process
- Learn and practice aseptic technique
- Learn about PPE
- Read this whole guide start to finish
- Make a list of how this guide is different from what you’ve done in the past
- Explore the items in “Topics” area of the sidebar to improve your knowledge
Science-Mind
When you homebrew you’re doing something that is highly regulated and whose secrets are highly guarded. It’s also pretty dangerous to cook something in your kitchen and then to inject it into your own body. You’ll be best served if you adopt a science mindset as you move forward. Ask as many questions as you can about why things are they way they are. Ask if things are safe or not. Ask why we know if they’re safe or not. Keep this up and never stop.
You should be thrilled to learn that there’s a better way to do something. Treat every failure as a success because your set of knowledge just got broader. Be cautious of people with homebrew knowledge who are highly defensive and who have no data to back up why what they do is “safe.”
Accidental skin contact
Be aware that full PPE should be worn while following this guide, including gloves, masks, hair covers, and a tyvek suit. All people can have their hormone profile interferred with if they make accidental skin contact with what they’re brewing. If you are a person who has hormone cycles, or a person who is on testosterone to suppress those cycles, you may notice that accidendal skin contact is detrimental to that cycle.
You will come into contact with this preparation, and you need to have PPE protecting you.
A lot can go wrong here, I’ve seen it first hand. Protect yourself.
Create a guide summary
Preparing for the day of your brew, you should have a personal summary of this guide written out so you don’t have to refer to a website constantly.
Optional: Read the Large Guide
The large guide is way more detailed and has a bunch of techniques that aren’t listed here. You’ll be able to apply many of them to this guide if you choose to. This guide is more of a “bare minimum” needed to produce approximately 20 vials.
Medium Guide: Supplies
Active Pharmecutical Ingredient (API)
Excipients
Vials
- 3/5/10mL Vials
- Vial caps (sized for your vials)
- Butyl rubber stoppers (sized for your vials)
Tools
- HEPA air purifier or CR box
- Autoclave or Instant Pot
- Oven
- Still air box or laminar flow hood
- Vial crimper (sized for your vials)
- Work surface
- Plastic sheeting (to make clean room)
- Milligram scale
- Pyrex beakers of appropriate size for mixing
- Glass stirring rod
- Oven thermometer
- Laser thermometer
- Baking dishes
- Spray bottle
- Small bottle brush (for vials 3/5/10 and 100mL)
Disposables
- 18g sterile luer lock needles
- 18g sterile luer lock dispensing needles (blunt tip)
- 3mL sterile luer lock syringes
- 20mL, 30mL, or 50mL sterile luer lock syringes (larger is more difficult to filter with, but less likely to blow out)
- Sterile 0.22μm PTFE or nylon syringe filters
- 100mL glass vials (don’t get pre-sterilized, if that’s all that’s available, you must disassemble them and resterilize them yourself, you’ll need the 20mm crimper for this)
-
- 20mm butyl rubber stoppers (if needed)
-
- 20mm caps (if needed)
- Isopropyl alcohol 70% (IPA) (buy exactly 70%)
- Disinfecting hand soap
- Aluminum foil
- Distilled water
- Disinfecting, anti-viral wipes (or spray) such as SciCan Optim1 wipes. Get the good stuff.
- Paper towels (lint free) or 4x4 gauze squares
Personal Protective Equipment (PPE)
- KN95 or N95 face masks
- Latex/nitrile gloves
- Tyvek suit
- Hair covers (includes facial hair)
Medium Guide: Setup
This step is almost identical to the step in the large guide, follow that here, then come back to the medium guide.
Below are a couple modifications you may want to make.
Building a Clean Room
This is sort of optional, though I’d highly recommend it to help keep dust and bacteria out of the beaker you’re stirring in as well as to help control for extra dust and bacteria during dispensing.
Wash and Sterilize Tools and Vials
You can use regular dish soap here assuming you’re not reusing any vials. If you are reusing vials you may want the alconox that step talks about.
Still Air Box
Learn about building and working with a still air box here.
Medium Guide: Mix
Similar to the last step, you can follow the large guide for the mix step. Follow that here. Then come back to the medium guide.
Instead of the “laminar flow hood” that this step talks about do all of your work in the still air box.
Medium Guide: Filter
Haha, once again use the large scale guide for this step, find that here.
Use either the “hand filtration tek” or the “caulk gun tek.”
Bubble point testing is required.
Medium Guide: Dispense
Back to working with the medium guide.
By now you should have one or two 100mL vials that are full or partially full of the filtered and compounded sterile preparation (CSP).
Setup
You’re going to be working in the still air box. You cannot be in and out of it while you’re working, you need to try to not remove your arms at all as this causes a lot of air to move in and out of the box.
The box should be cleaned with your anti-bacterial and anti-viral cleaner.
Inside the box:
- sterile empty vials with hats on
- sterile stoppers in envelopes
- the 100mL vials with CSP
- needles (wrapped) for drawing/dispensing
- 20mL syringe (wrapped) for dispensing (1 or 2)
- alcohol swabs (wrapped)
- sterile tweezers (wrapped)
Wipe down the items that go in with some isopropyl alcohol. Don’t spray or wipe down the sterile empty vials or sterile stoppers. Read the aseptic technique page if you need more details.
Put gloves on your hands and spray them with IPA.
Dispense
Never hover your hand or any object over an open vial. Due to bacterial shedding, and the fact that bacteria falls down, doing so could cause invisible bacteria to enter your vials.
Put your hands in the still air box.
Wipe the 100mL CSP vial with an alcohol swab.
Draw up an amount of CSP that is divisible by your vial size. Example: for 3mL vials draw up 18mL, this dispenses into 6 vials. For 5mL vials draw up 20mL, this dispenses into 4 vials. For 10mL vials (really not recommended) draw up 20mL, this dispenses into 2 vials.
Holding the 20mL syringe in one hand, pick up an empty vial, remove the foil hat, and dispense the amount of CSP needed. Try not to touch the vial with the needle (difficult on 3mL vials).
Set down the vial. Keep the syringe in hand. Slightly uncover the envelope storing the stoppers and use the sterile tweezers to pick up a stopper and place it on the vial. Push the stopper into place with your finger. Cover the stoppers back up, with the tip of the tweezers inside the envelope to keep them clean.
Pick up another vial and repeat. Do not leave vials without stoppers for longer than absolutely necessary in the still air box as bacteria may fall into them at any time.
Before you draw new CSP, change your needle out as it may have gotten contaminated.
Change your syringe every 3-5 times you use it to draw.
Once all vials are filled and have stoppers in place, you can retrieve the caps and the capper. Go ahead and cap the vials.
Medium Guide: Final Steps
Once again, follow the large guide. You can find that here.
Good job! Do your final steps according to the link above.
Large Scale Guide: Preliminaries
Please read this entire page.
Note: Unlicenced manufactuere of testosterone is illegal in the United States and possibly other juristictions. This guide is only for use in juristictions where its use is allowed, or for use with legal substances.
Warning
This guide creates injectables. A lot of them. Considering the size of the batch you’re preparing to make, these injectables will be going into the bodies of people you don’t know, bypassing the wonderful filtration system of their digestive organs. Injectable preparations are inherently more dangerous than topicals or orals. Do not skip steps. Do not skimp on prices. You want to do this, so do it right, the first time. You have an obligation to keep the people you’re serving safe.
Please contemplate if you’re capable of doing this process correctly before beginning.
Making Testosterone or Estradiol
It is a near identical process for compounding these two hormones. The only major difference is that the ratios of the ingredients slightly differ. Cost is also, roughly, the same. This guide will teach you to make both and when it comes time to get your recipe, just choose the one relevant to you.
Scale: Up to 200 Vials
This guide is designed to create roughly 600mL of your target preparation, dispensed into 200 3mL vials. You can, of course, change these sizes and quantities as you see fit.
You can do less, and you can for sure do more, but you will start running into upper limits of how much a couple of hard workers can accomplish in a long weekend.
Cost
Rough estimate (2025, USA)
- $2000: Equipment
- $500: Disposables
- $500+: API (active pharmaceutical ingredient)
- $200: Excipients
- $500: Misc expenses
Probably good to have at least $4,000 set aside if you’re going into this starting with no equipment.
I watched a kitchen preparing to use this guide spend around $5,000 and still need more for odds and ends. I think it depends on what you’re starting with, how you spend, where you spend, etc. If money was no object I could easily drop $10k on this.
Time Commitment
These are total estimates:
One time only:
- 1-2 months studying, preparing, ordering
- 1 month learning your equipment
Every brew:
- 10 hours of prep work
- 30 hours of brew time
You NEED Helpers
This is way too big of a task to do alone. My most recent brew of this size I worked with a single part time helper. In a three day weekend I logged over 35 hours of work and my helper logged around 10. I cried. A lot. Unfortunately this isn’t something you can space out over a longer period of time. Because you’re working with sterile shit you need to accelerate timelines.
An ideal setup for me would look like a three day weekend, 10 hour days, and the following personnel:
- Me, brewmaster-ing, full time
- Helper 1, skilled assistance (or co-brewmaster), full time
- Helper 2, prep work, part time
- Helper 3, care work (food, dishes, music, errands, vibes), full time
Do not underestimate the importance of a care worker. Budget for good food.
Trust & Security
Even taking into account that you’re doing this in a place where it is legal, you’re still going to want to keep this operation completely under wraps. There are many people, some with lots of power, who would not take kindly to you doing this work. It’s best to stay as quiet as possible about this. This is difficult considering there are several people, lots of equipment, and presumably distribution. If you do not consider yourself moderately advanced in security culture, then you need to make moves to get there. Find someone in your network that you can fully, truly trust who is read into security culture and gently ask them for help.
Your network should have as much isolation built into it as possible. Your care helper, for instance, doesn’t need to know about distribution or the people involved in that. Some people, if they don’t already know every other helper going in, will use an alias in the brew space, so as to keep their identity secret.
Make sure the people you’re working with can be trusted. You’re not just trusting whether or not they are cops/nazis, but you’re trusting their ability to keep their damn mouths shut about the brew project. Bringing someone on who frequently overshares, who is clutzy, who forgets, etc is bringing on a security weak link.
Many people view brewing HRT as “cool.” While, yeah, it’s cool, this is also a red flag. This attraction to “cool” will cause people to make poor security decisions over time. We need to avoid spreading the word about what this project is for any reason that is not strictly strategic. Am I guilty of reading in a few friends? Of course. And we want to limit how volatile that spread of information is. Stop being cool.
Try to limit who you tell about what you’re doing. All 12 people in your polycule don’t need to know. They can know you’re up to something, but they need to respect that it’s a need-to-know project.
Best practice would be to keep the project highly isolated from your full social life, and to have the distribution channels make the final product leave your circle. You do not distribute yourself. The brewer needs to stay as protected from distribution as possible. In an ideal world the brewer has a single distribution point of contact that moves product quietly away from the brewer and brew site. The brewer does not and should not need to know destinations.
Don’t leave this project set up. You set it up to brew, and you tear it down when you’re done. Too much risk comes from staying set up.
Standard Loss
With any batch, but particularly with a large batch, you’re going to have some loss.
10% loss should be considered standard. 20% loss will not be uncommon, especially if you’re new to all this.
If I’m trying to make 200 vials, I will prepare everything as if I’m making at least 220.
Loss can come in various forms:
- water exposure (from wetpack)
- messed up sterilization of glass etc
- spills
- drops on the floor
- fails visual inspection
- blown filters
- run out of supplies
- run out of time/energy
Other Guides
I’m not aware of any other guide that attempts to teach how to brew at this scale. Use extreme caution when combining information from other guides with this one. This guide is designed to be a whole unit with supplementation not needed except where explicitly flagged. Much of the homebrew advice available online is not properly researched and explicitly advises poor and dangerous practices.
Large Guide Contents
- Defining and gathering supplies
- Building a work area (makeshift clean room)
- Preparing materials (sterilizing)
- Working in front of a laminar flow hood/box
- Choosing an appropriate Tek for filtration
- Using bubble point tests to ensure filter integrity
- Dispensing into smaller vials
- Capping
- Visual exam
- Label
- Log
Pre-Brew Education
Please read up before beginning this process
- Learn and practice aseptic technique
- Learn about PPE
- Learn how to work in front of laminar flow
- Read this whole guide start to finish
- Make a list of how this guide is different from what you’ve done in the past
- Explore the items in “Topics” area of the sidebar to improve your knowledge
Science-Mind
When you homebrew you’re doing something that is highly regulated, the secrets of which are strictly guarded. It’s also pretty dangerous to cook something in your kitchen and then to inject it into your own body. Even more so to give it to other people to inject. You’ll be best served if you adopt a science mindset as you move forward. Ask as many questions as you can about why things are they way they are. Ask if things are safe or not. Ask why we know if they’re safe or not. Keep this up and never stop. It would be low key insane to assume you know what you’re doing at any point in this process. The people who do know what they’re doing have received highly specialized training, training that you will never have access to. Logging 1,000 hours in your home lab is nothing compared to professional know-how. Never forget that you are an amateur. Always question yourself and your assumptions.
You should be thrilled to learn that there’s a better way to do something. Treat every failure as a success because your set of knowledge just got broader. Be cautious of people with homebrew knowledge who are highly defensive and who have no data to back up why what they do is “safe.”
Accidental skin contact
Be aware that full PPE should be worn while following this guide, including gloves, masks, hair covers, and a tyvek suit. All people can have their hormone profile interfered with if they make accidental skin contact with what they’re brewing. If you are a person who has hormone cycles, or a person who is on testosterone to suppress those cycles, you may notice that accidental skin contact is detrimental to that cycle. I have seen people wearing poor PPE have skin breakouts, early/late periods, and even reappearing periods.
You will come into contact with this preparation, and you need to have PPE protecting you.
Staying Clean
As you go, you’re going to have spills of the preparation. Whether it’s just a few drops here and there or full vials tipped over, eventually it’s going to be on your work bench. As soon as you identify spilled preparation, finish any time sensitive sterile task, then immediately clean it up. You 100% need to avoid getting it on anything that will spread it around.
To clean a spill:
Spray rubbing alcohol on a paper towel, then use that to pick up the spill. Go back over it with more alcohol on a fresh paper towel.
Create a guide summary
Preparing for the day of your brew, you should have a personal summary of this guide written out so you don’t have to refer to a website constantly.
It might also be useful to create a work schedule for your and your crew.
HRT.Mom is not Perfect
While I hope it’s clear how much work I’ve put into this, it is far from perfect. Please contact me if you spot any errors worth fixing, or if you believe I’ve gotten the science wrong anywhere. It’s also likely I’ve left a few things out of the supplies list etc.
Large Guide: Supplies
Active Pharmaceutical Ingredient (API)
ExcipientsInactive ingredients in the compounded preparation
Vials
For final product:
- 3/5/10mL Vials
- Vial caps (13mm for 3mL or else 20mm)
- Butyl rubber stoppers (13mm for 3mL or else 20mm)
For sterile storage:
- 100mL glass vials (don’t get pre-sterilized, if that’s all that’s available, you must disassemble them and resterilize them yourself)
- 20mm butyl rubber stoppers
- 20mm caps
Tools
- HEPA air purifier or CR box
- Autoclave or Instant Pot
- Oven
- Laminar flow hood (still air box not allowed!)
- Magnetic stirrer
- Vial crimper (20mm) (For 5/10/100mL vials)
- Vial crimper (13mm) (For 3mL vials)
- Work surface (marble or stainless steel ideal, no wood. cross check material with compatibility with ingredients)
- Task light
- Plastic drop cloth sheeting (to make clean room)
- Milligram scale
- Pyrex beakers of appropriate size for mixing
- Glass stirring rod
- Oven thermometer
- Laser thermometer
- Baking dishes
- Spray bottle
- Small bottle brush (for vials 3/5/10 and 100mL)
- New sponge (for scrubbing)
- Metal tweezers x3 (I prefer curved)
- Extra large tupperware (e.g. 50 quarts) to store sterile items in
Disposables
- 18g sterile luer lock needles
- 18g sterile luer lock dispensing needles (blunt tip) (optional)
- 20mL sterile luer lock syringes
- 50mL sterile luer lock syringes
- Sterile 0.22μm PTFE or nylon syringe filters (not needed for bottle top filtration tek)
- 0.45μm PTFE or nylon syringe filters (for pre-filtration) (not needed for bottle top filtration tek)
- Isopropyl alcohol 70% (IPA) (buy exactly 70%)
- Disinfecting hand soap
- Alconox (lab detergent)
- Aluminum foil
- Distilled water (3+ gallons/10+ liters)
- Disinfecting, anti-viral wipes (or spray) such as SciCan Optim1 wipes. Get the good stuff.
- Paper towels or disposable shop towels
- Painters tape and maybe also duct tape
Personal Protective Equipment (PPE)
- KN95 or N95 face masks
- Latex/nitrile gloves
- Tyvek suit or similar lab garb with wrist cinch
- Hair covers (includes facial hair)
- Shoe covers
Random
- Broom, Mop, etc to clean in preparation
- Music
- Plan all your meals
Large Guide: Setup
Creating a Work Area
Table
Your work area has a table with two chairs that you can sit at. The table is around 6ft/2m long and deep enough to really utilize the space.
The table is made out of a material that, if you were to accidentally spill the compounded preparation onto it, that it wouldn’t absorb any and there would be no interaction between the table material and any of the excipients. For this reason you should attempt to use stainless steel or marble. Certain plastics can be okay if you cross check them against the excipients as well as isopropyl alcohol and whatever your anti-viral cleaning agent is.
A safe, large plastic board on top of a wood table can be a cost cutting measure.
Clean Room with Positive Pressure
Surrounding the table you have hung plastic sheeting from the ceiling with painters tape. You’re ideally creating a decent (doesn’t need to be perfect) seal between the sheeting and the ceiling. Similarly, you’re taping the sheeting to itself where new sheets overlap to create a seal on the walls. Also do this on the floor. Leave a large overlap unsealed for a doorway.
Get crafty, and fashion a way to direct airflow from outside your tent, through your HEPA filter, and then blow the clear air directly into the tent. The outlet for the HEPA blowing clean-ish air into the tent needs to be air tight. The HEPA should not be directly next to the doorway, but should not be on the opposite side of the door so that the workspace is in the middle. Ideally the outlet is somewhat low to the ground.
Here’s a diagram I made in MS Paint.
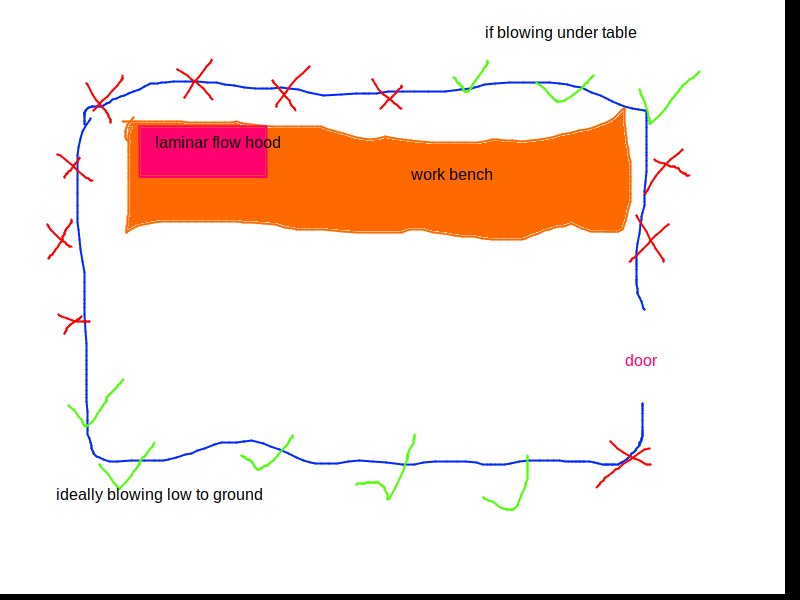
If done correctly, the HEPA will inflate the tent. All the walls will push out, and there will be a gust of wind leaving the tent at all times directly through the doorway. This is good. We want the “positive pressure environment” to direct air out of the door. Now we know that all the air in the room has been pre-cleaned through your HEPA.
Notice that the HEPA does not have the opportunity to blow directly onto the table, or across the work area. It’s especially not blowing on the laminar flow area.
If I were to go all out, the HEPA would be MERV 17, but anything that is controlling for dust is better than nothing.
Controlling for Dust and Pet Hair
The makeshift clean room with the positive pressure environment will prevent stray dust and pet hair from wandering into the space. However, dust and hair can still get in one major way: when you walk it right through the door!
Everything you bring into the clean room, including chairs, tables, lights need to be wiped down proper. Ideally you’re not brining in any upholstered furniture into the room.
Additionally you need to be controlling for pet hair and dust on your clothes, skin, and shoes. Don’t roll around in your cats bed and then walk into the clean room.
Creating a Demarcation Line
If you have room, create a little ante-chamber to your clean room that has a clear demarcation line on the floor. This is the line that can’t be crossed if the person isn’t wearing the proper clean room materials. The person should also avoid wearing their clean room gear out into the rest of the space. It would be helpful to have a coat hanger or similar in here to give the workers a place to hang everything.
Wash and Sterilize Tools and Vials
Aluminum Foil Hats and Pouches
This can be done days in advance. You can also use autoclave pouches for the autoclave items but I don’t use those so I can’t advise you on how to do that best.
Everything you sterilize needs to be covered in foil so that when you remove it from the oven/autoclave it is protected from particles and unsterile air. All foil should be double layered so as to be extra safe in case there is a tear or other mistake.
For autoclaved items the foil needs to be wrapped in a way to allow steam to enter the pouch or container.
For dry heat sterilized items, the foil needs to be wrapped in a way so as to allow residual moisture from wash/rinse to escape.
Every vial needs a hat. So that means if you’re trying to sterilize 250 vials, you need to prepare 250 small sheets of foil to use as hats. This takes awhile to prepare. If you use scissors to cut the foil it causes the layers to stick together, so then you need to peel them apart (you won’t want to have to peel them apart while your hands are wet and you’re wearing gloves).
I recommend you or someone else prepares these sheets for hats days in advance of your brew. Try it out yourself and decide what size you want.
Here’s an MS Paint suggestion on how to do it:
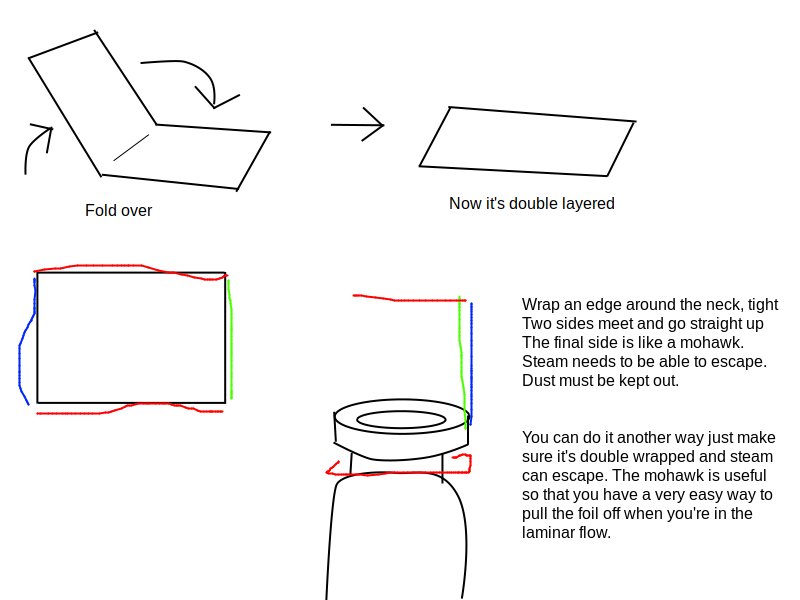
Washing Before Sterilization
Before you sterilize items, you need to do a thorough wash and rinse. It doesn’t matter if your item is brand new, if it just came out of the dish washer, or etc. You should wash it with Alconox or a similar cleaner that is designed for cleaning laboratory glassware. After you scrub it with Alconox, you should do a three stage rinse in distilled water, attempting to fully rinse the alconox off the item.
You can wrap the item/vial in the foil while it’s still wet. This is distilled water and will cleanly evaporate off when you put the item in the oven.
Put all your items set for the oven on a foil lined tray.
Items set for the autoclave will be wrapped in a way that lets steam in. You might poke a few holes in the foil to encourage that steam. The holes should be in such a way that they won’t let dust or bacteria fall in once you open the autoclave
Autoclave (Moist Heat)
Rubber stoppers need to be autoclaved.
Info about using an instant pot as an autoclave is here, though I recommend that you purchase an actual autoclave instead. A stovetop autoclave isn’t terribly expensive and is more reliable.
Oven (Dry Heat)
All glass should be depyrogenated in an oven.
Info about using an oven to dry heat sterilize is here
Removing from Autoclave / Oven
As the items come out of their sterilization cycle, cover them in yet another layer of foil, such as one large piece that can keep dust out and bacteria from falling on them.
Keep an extra-large tupperware that is meant to store all your sterilized items in. Before using it for storage, clean it with the anti-bacterial/vial/fungal cleaner. After all items are cooled out of the oven, transfer them into the tupperware and keep it sealed. The tupperware should live in your assembled clean room to limit it’s exposure to unclean air.
General Setup
Make sure your space is setup in a way where you can do all the work that you need to do without having to go in and out of the clean room constantly. Organize your items so you can work with them effectively.
Time to mix!
Large Guide: Mix
Recipe
Identify your recipe. If you’re making estradiol I recommend 20mg/mL and for testosterone I recommend 200mg/mL. There’s some analysis on what concentrations are best here and here.
Use the recipe calculator to determine your exact recipe. Follow the exact steps on this page.
Mixing
Never apply heat to benzyl alcohol. If you use heat to accelerate the mixing process, you must wait until after the mixture cools to add the benzyl alcohol. Learn more here.
Follow the “Important Info” section on the recipe calculator page for info about how to properly mix everything.
Do all of your mixing in front of your flow hood. While your ingredients are not all technically sterile, there is no reason to mix them in a way that might introduce more contamination. For the same reason, your container and stirrer should also be sterilized and depyrogenated.
Mixing can be automated through the use of a magnetic stirrer, though with a little patience this is not necessary.
Applying Heat, Carefully
Heat can be used to accelerate the mixing process. I recommend a hot water bath or a hot plate at around 35°C / 95°F.
| Ingredient | Max Temp |
|---|---|
| Benzyl benzoate | 40°C / 104°F |
| Benzyl alcohol | Room temp, do not heat |
There is no definitive data on how hot you can get the API, however anecdotal evidence suggests that heating it up to 121°C/250°F will not cause break down.
Oil may not begin to break down until nearing its smoke point, which will vary from oil to oil.
Benzyl alcohol has a flash point of 100°C, meaning that at that temperature enough of it is evaporating that the fumes can be ignited. Additionally BA can produce benzaldehyde when heated under certain conditions. For these reasons we avoid exposing BA to heat in any way. Read more here.
The Handbook of Pharmecutical Excipients (6th edition) says of benzyl benzoate that “exposure to excessive heat (above 40°C[/104°F]) should be avoided.” While I don’t have more info on why, the implication is that it loses stability at that temperature.
Cover
After mixing, or even during mixing if you’re using a magnetic stirrer, you should keep your preparation covered with either a lid, or a double layer of aluminum foil. Never open the lid except when under the laminar flow hood.
Large Guide: Filter
Now we’re really deep in it.
Filtration is the only viable method for sterilizing our preparation. You must handle the preparation with the utmost care to ensure that sterilization does actually happen.
I highly recommend that you filter the preparation directly into sterile and capped 100mL vials. This ensures that no unsterile air can touch the preparation as it goes through the filtration process.
If you are sufficiently advanced you may choose bottle top filtration as it can be a more hands off approach. The downside to bottle top filtration is that you will be dealing with an open container of sterile preparation, so your aseptic technique will need to be stellar. This is 100% a skill issue. And an equipment quality issue also. Don’t do this unless you’ve been doing it the other ways and you’re confident and ready to upgrade your technique.
Pre-Filtration
The USP recommends doing a pre-filtration step. This is a new-ish recommendation to me and as of May 1, 2025 it has not been fully written into this website. A pre-filter does not need to be sterile, but it does need to be PTFE or nylon. A pre-filter is ideally 0.45um.
The idea is that you use the pre-filters to catch larger debris first, and then when it’s time to use your sterile filters they can work more efficiently and effectively. This might feel excessive but it’s all in service of the CSP actually becoming sterile with a high level of confidence.
Method
- Filter using the 0.45um filters into sterile 100mL vials.
- Second pass filter using sterile 0.22um filters into NEW sterile 100mL vials.
To do this right you need double the 100mL vials as your target volume.
Filtration Options
Hand Filtration
Pros: cheap
Cons: slow. Requires your constant attention. Your thumbs will be sad. Can only do one at a time.
Caulk Gun
Pros: pretty cheap. Requires less attention than hand filtration. Easier on the thumbs. Can probably do multiple at once.
Cons: still requires a lot of attention and you’ll still be giving it that attention for hours at a time. much easier to blow the filter.
Syringe Pump
This is my recommended option.
Pros: Do multiple at once if you get the right model. If you program it right you can literally just walk away for an hour. Once you get the programming right you’re pretty much good to go.
Cons: Costs a few hundred dollars. Still pretty slow. Have to change out the syringes still. Easy to blow a filter if you program it wrong.
Bottle Top Filtration
Pros: Do the entire batch in one go, completely hands off.
Cons: Somewhat expensive filters. Unclear how to verify if the filter maintained integrity during filtration. Needs vacuum pump. Requires A+ aseptic technique to process correctly, which most hobbyist brewers likely do not possess.
Don’t do this unless you have a flow hood you’re confident works correctly and your aseptic technique is A+.
Vacuum Syringe Filtration
There are instructions floating around online about how to rig a syringe filter up to a vacuum pump for the filtration process. While it’s very ingenuitive, it is likely not a safe practice. Syringe filters are designed to be pushed through, not pulled through. In my own test of this tek I found there to be too many unknown variables to adequately consider it safe.
Skip the MacGyvering and just buy a syringe pump.
Choose Your Path
You can choose one of the above teks for filtration. You should end with your sterile preparation in a series of sealed 100mL vials, or in the case of the bottle top tek, possibly in a large sterile beaker with a cap.
I believe the syringe pump is the best option here as we can filter directly into sealed, sterile containers. We can also verify the integrity of the filters through a simple bubble point test.
Always Perform Bubble Point Testing
While this many not be possible for bottle top filtration, bubble point tests need to be preformed for all syringe filters that are used in this process. If any syringe fails the bubble point test you need to refilter or discard all of the preparation that went through it.
Large Guide: Dispense
Your Setup
You’ll be working in front of your laminar flow hood for this whole procedure. You are not working in a still air box, as you’re processing far too many vials to not have a fully sterile environment.
You have stoppers in a sterile container that you can open in front of the laminar flow so they will stay sterile.
You have multiple wrapped sterile tweezers that you will use to pick up the stoppers. If you accidentally drop one or touch it to something non-sterile you can swap it out for one of your sterile, unused ones.
All of your vials are sterile and still have foil hats on them. They are staged in a way that you have ready access to them as you need them.
I prefer to dispense with a 20mL syringe with a 18g needle attached. You may have bigger hands than me and like a larger syringe. I find that the marks on the side of the 20mL syringe are easy to read.
- My 100mL vials are ready to go.
- Spare 20mL syringes, ready.
- Spare 18g needles, ready.
- Alcohol swabs, ready.
- 70% IPA spray, ready.
- Paper towels, ready.
- Vials caps, ready.
- Vial crimper, ready.
My laminar flow hood has been running, in my tent with a positive pressure environment, for at least an hour in order to get the ambient air in the tent as clean as possible.
I have wiped my whole work area down with my anti-bacterial, anti-viral cleaner.
If my laminar flow hood requires it, my work area in front of the flow hood is slightly elevated so that all my work is happening in front of the flow.
At no point in this process will I have to get up and leave. I won’t need to dig through any boxes. Everything I need is staged, and anything I won’t need is moved well out of the way.
My task light is on so I can see clearly.
I have a helper, Person 2, sitting next to me who understands how this is all about to go down. Person 1 will do the bulk of the aseptic work.
You are wearing full PPE.
Working in Front of Laminar Flow
This is a discussion that exists here and here. Please don’t skip. Perfect aseptic technique is an essential part of how our vials end up sterile. Make sure your helper understands this as well.
If you work on a riser in front of the flow hood, make sure it’s not positioned so that if something spills it can fall onto the filter.
Dispensing
I’m going to outline a recommended way to work. You may find a workflow that you prefer more.
I’m assuming you’re using 3mL vials and 20mL syringes, adjust as needed.
Person 2 opens the 20mL syringe / 18g needle packaging in the sterile field. They attach the two. They draw up 18mL of air from the sterile field. They use an alcohol swab to clean the stopper of a 100mL vial. The inject 18mL of sterile air, and draw up 18mL of sterile preparation, without large bubbles. They cap the needle. They do this again with another syringe.
We use 18mL as it is divisible by 3, and we’re using 3mL vials.
Person 1 takes the syringe and in the sterile field removes the cap. They hold the syringe in hand while removing the hat from a sterile vial. Trying not to touch the needle to the side of the vial (difficult for a 3mL vial) they inject 3mL into the vial while still holding it in their hands.
They set the open vial down near the filter of the flow hood to minimize risk of anything accidentally being set in front of it.
18mL -> 15mL -> 12mL -> 9mL -> 6mL -> 3mL -> 0mL
Person 1 does one vial at a time, lining them up across the sterile field. They are not placed in front of each other, but next to each other. After they’re finished they can set the syringe down, and Person 2 can fill it back up.
Person 1 takes the tweezers and gently places a stopper on each vial that’s been lined up.
Either Person 1 or Person 2 can use their clean, gloved finger to press the stopper into place. Person 2 can place the caps on top of the stoppers and crimp them.
Person 1 continues in the same fashion, filling vials and placing stoppers.
Person 2 continues filling syringes and crimping vials.
We start with brand new needles and syringes as often as possible with the economics of your setup. Changing them out every time you start on a new 100mL vial would be a decent benchmark, meaning each would get used for dispensing about 3 time.
Crimping does not have to take place in the sterile field if you have limited room. Once the stopper is pressed down into place the vial is technically sealed. Sometimes pressure in the vial will cause the stopper to pop out of place. If this happens while not in the sterile field you need to throw away the vial.
All done!
Large Guide: Final
Now that all your vials are capped you can, for the most part, tear down your operation.
Batch Log
Create a batch log. It should have details from your brew so that you know what you did. You don’t have to log everything, but log the variables. For example.
- 100mL vials reused, scrubbed with Alconox
- Sterilized glass using dry heat at 500F for 60 minutes. Temperature confirmed twice during cycle.
- Autoclaved stoppers for 30 minutes at 16psi.
- Positive pressure HEPA fan may have been blowing dust into tent. Reminder to seal the filters to the body of the fan with tape for next brew. Big HEPA (Honeywell) cannot be trusted.
- Did not add BA until mixture cooled
- Syringe pump was operated by compressing 15mL of air into 10mL of air and then maintaining this 10mL. The arbitrary number the syringe pump was programmed with to maintain this was 0.3
You should have these notes labeled with a batch number that ends up on the vials. You want to be able to look back and see what you might have done wrong if an issue does arise. This is so important for safety and for learning.
Inspect
Inspect your vials, one by one, extremely carefully. Each vial deserves 30-60 seconds of inspection.
Take a paper towel with alcohol and wipe the vial down to remove any debris or dust on the outside. Hold the vial up near a light source and tilt the vial on its side. Holding the cap, rotate the vial so you can view it from many angles. Rock the vial back and forth so you can see the liquid move in this other direction.
You’re looking for a couple things:
- Water: tiny specks of water can get in from autoclaving the stoppers. Water cannot be in a vial. Reject.
- Dust: if you did everything correctly and you still find dust that’s a big red flag for your whole procedure. Anyways, keep an eye out.
- Rubber bits: if you cored a stopper and accidentally dispensed that core.
- Air bubbles: learn to identify air bubbles in your vials. They’re harmless, but you want to be able to quickly know what’s what.
Wipe
Personally, I don’t want my fingerprints all over 200 vials. Even though I’m doing this in a place where it is perfectly legal, it’s just not classy. While wearing gloves all vials are wiped with a towel and alcohol to ensure no fingerprints are on them.
Label
All vials need to be labeled. I believe that labels should have a few things:
- Name of the compounded preparation, e.g. Estradiol Enanthate
- The concentration, e.g. 20mg/mL
- The inactive ingredients, BB BA carrier oil
- Batch number
- Expiration date, 2 years is probably safe
- A “Lab name” if you think people will benefit from knowing it’s coming from the same place
- A QR code
The QR code can link to a webpage, even just like a riseup pad or something, that has information about this specific batch. That page might contain:
- Batch number
- Expiration date
- Note to use the vial within XX days of opening (I recommend 30-90)
- A link to diyhrt.info to help them learn how to use the vial
- A chart converting various doses from mg to mL
- anything that feels appropriate
You 100% should not say on the label or on the QR code site that this is medicine. You should not recommend doses for people. These things could come with legal risks that are not necessary to take on.
Apply labels with gloves so they stay nice and clean. Use tweezers if you need a way to peel the label with out getting your finger oils on it.
Oh Shit I Have 200 Vials
Nice nice.
Closed Vial Tek
this page has not been written yet
Bubble Compression Tek
Bubble compression is a technique that can be applied to all forms of syringe filtration. It’s hard to know how hard we’re pushing on a syringe, and thereby pushing on the filter. If we leave some air in the syringe we can easily monitor how much that air is being compressed. Then we know how much pressure we’re exerting. Use the Boyle’s Law Calculator to help you determine how much pressure you’re exerting.
Here. I drew u a convenient diagram:
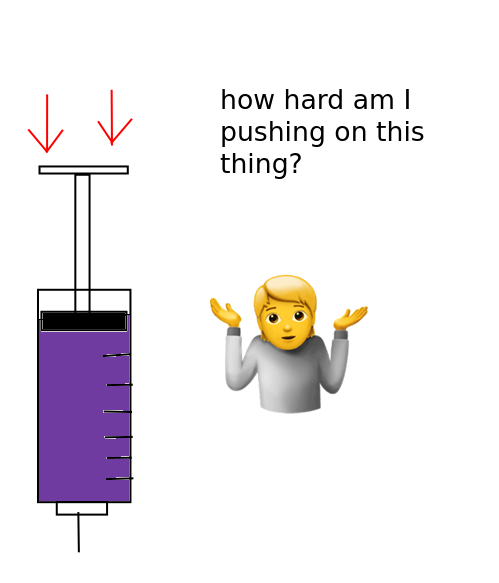
Now lets look what happens when there’s an air bubble:
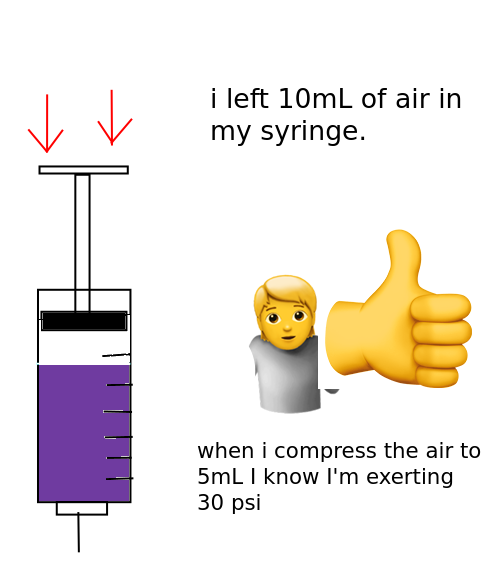
Example compression ratios
| Starting Air Bubble | Gets Compressed Into | Resulting in |
|---|---|---|
| 10mL | 7mL | 21 psi |
| 10mL | 5mL | 30 psi |
| 10mL | 3mL | 50 psi |
Use a larger starting air bubble for more fine grain control on the pressure.
Use Boyle’s Law Calculator to calculate your own values. “Initial pressure” can be filled with the current air pressure of your city, which you can find on a weather app. 30inHg is a pretty standard value.
Benefits
This technique will:
- Help prevent you from pushing too hard on your filters, and thus causing blow out.
- Make it easier to push, especially if you’re hand filtering.
- Allow you to know how hard you’re pushing, useful if you’re trying to push through a filter at a high speed without breaking the filter.
I recommend combining this tek with any other syringe filtration tek you try.
Hand Filtration Tek
this page has not been written yet
Required: Combine this tek with the closed vial tek and the bubble compression tek
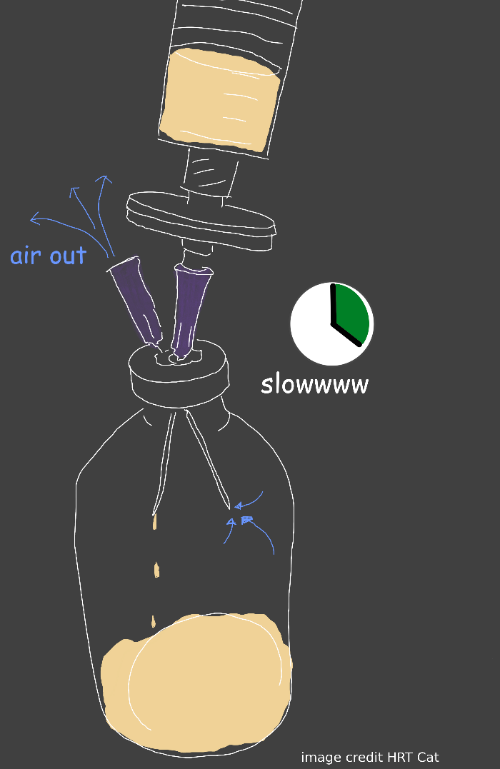
Caulk Gun Tek
As found on HRT Cafe .
Please read my critique of HRT Cafe brew methodology before investing too much time on their site.
Required: Combine this tek with the closed vial tek and the bubble compression tek
Items Needed
- Caulk gun
- Test tube stand or similar way to mount caulk gun
- Optional: plastic or wood to keep syringe in place
Technique
You can use a caulk gun to help you push the plunger on a syringe filter. Mount your caulk gun to a test tube stand or similar, place the syringe into the gun, leaving around 10mL of air, and filling the rest with your preparation. The caulk gun will push the plunger, which will slowly compress the air. The compressed air will push the preparation through the filter.
Fit a piece of wood or plastic around the opening of the caulk gun to help the syringe stay in place and not get pushed through when you’re triggering it
When you mount the syringe into the gun, you want to make sure the syringe filter is not inside the caulk gun itself, but is safely outside the body.
Filter into a 100mL vial like you normally would by hand, also remembering to use a vent needle in your vial.
I personally use 10mL of air in my syringe, and then compress that down to about 5mL of air. This creates a pocket of pressurized air that is strong enough to push the preparation through the filter but not so strong that it breaks the filter.
Then, around every 90 seconds, I find that I just have to trigger the caulk gun a little bit more to keep up with that target of 5mL of air.
Syringe Pump Tek
this page has not been written yet
My preferred method of filtration.
Required: Combine this tek with the closed vial tek and the bubble compression tek
Bottle Top Filtration Tek
this page has not been written yet
this is hard to do correctly. avoid if possible.
The Spirit of Critiques
Critiques are here purely to help other people understand the science behind compounding sterile HRT, and how some of these other guides may fall short of that. They are additionally useful in helping their authors understand more about the HRT brew process from my perspective, a perspective the is based on research and science.
This is meant to be educational and to help the vast homebrewing community collectively step up their game into more science based methodologies.
Critique: HRT Cafe
You can read about the spirit of the critique here.
This critique was written in February 2025 using the three HRT Cafe pages backed up here , here , and here . HRT Cafe publishes their guide here .
Summary
HRT Cafe’s two guides, “Injection Tutorial” and “Advanced Injection Tutorial”, are well intentioned, but miss the mark on several fronts. HRT Cafe is likely the most visible website on the internet that promotes material on how to homebrew. For this reason they should be held to a very high standard.
The major problems are the following:
- The guides are overly concerned with controlling exposure to dust, but continuously fail to mention controlling for bacteria and viruses.
- They promote the myth that steam based sterilization is possible for HRT, and they do not use any sources to support their claim. (Read more)
- At several places they heat the solution up, either on a hot plate or in the autoclave, exposing benzyl alcohol to heat. This risks evaporation as well as toxic oxidation. (Read more)
- They promote isopropyl alcohol 99% which is significantly less effective for disinfection than 70%. (Read more) (USP recommends 70%1)
- They downplay the importance of depyrogenation and claim that it’s “optional.” (USP says required2)
- They recommend silicone stoppers as an alternative, which benzyl alcohol can evaporate out of. (Read more)
- They recommend building a “moving air box” and further recommend a deeply inadequate filter for it. This is essentially a contraption that is exposing the entire brew process to contaminated forced air. Very unsafe.
For them to create stronger guides they would fix the issues above and introduce a strong concept of aseptic processing technique.
While the creator of this guide is clearly very intelligent and crafty, they are failing to properly research what they are claiming to be an expert on, and instead are making assumptions and claims based on what they think is probably correct. Someone in their position, at the middle of the DIY scene, should take more responsibility for the information they are passing along to the public.
The Guides
Experimenting with the last line of defense against vial contamination should not be taken lightly.
Hard agree. Don’t mess about with your Benzyl Alcohol. Unfortunately, the autoclaving found later in the HRT Cafe guide is risking converting the benzyl alcohol into benzaldehyde. More info about that here.
While this is accurate, this article’s placement is misleading. This article is about sterilizing “Fresh Water” aka “Lake Water” or “River Water”. This is very different from working with components that are already relatively clean, like your API that’s straight from a lab, your BB and BA that are already sterile, or your oil that’s hopefully pharmaceutical grade and not overrun with microbes.
I recommend using steam-based terminal sterilization in combination with filtering and a preservative.
Steam sterilization is not terminal sterilization for non-aqueous solutions, and it doesn’t actually do what is being claimed. Non-aqueous solutions cannot be autoclaved. Further, as mentioned above, you should never heat up benzyl alcohol.
claims otherwise are not taking into account the amount of heat transfer which actually occurs.
As laid out in the sterilization theory page, the max heat that can be transferred in this scenario is the max temperature of the autoclave, typically 121°C, which is drastically below the recommended 160°C when steam isn’t making direct contact with the item to be sterilized. The steam cannot transfer more heat than actually exists in the system. The glass can’t transfer the moisture into the preparation, it needs heat, moisture, and pressure all in tandem. These three things together destroy microbes.
When it’s just heat, or just heat and pressure, then you’re dealing with dry heat sterilization, as the glass is keeping the steam from reaching the compounded preparation. Further, even if the steam could reach the non-aqueous preparation, it can only make contact with the top most layer of the preparation. Steam cannot penetrate oil. Every pharmaceutical compounding textbook I’ve checked agrees on this point: you cannot steam sterilize a non-aqueous solution.
According to Compounding Sterile Preparations, 4th edition, “For high-risk sterile compounding, documentation must be available to prove that methods of sterilization work properly.” Since we cannot find documentation stating that non-aqueous can be steam sterilized, and can only find information on the contrary, it seems safe to say that this doesn’t work. Let’s also not forget the risk autoclaving poses to the benzyl alcohol.
Again, from Compounding Sterile Preparations, 4th edition, “[Steam sterilization] is the preferred method to sterilize aqueous solutions and suspensions that have been verified to maintain their chemical and physical stability under the required conditions.” Reminder that our solution is non-aqueous and that it has not been proven to maintain chemical stability under those conditions.
We do not autoclave our compounded preparation for at least two reasons: 1. Autoclaving puts benzyl alcohol at risk of oxidation, which produces the toxic compound benzaldehyde and lessens the volume of benzyl alcohol in the preparation3 and 2. Autoclaving a non-aqueous solution is not proven to be effective4.
Injection Tutorial
Instant Pot Pro Plus. Do NOT use a regular instant pot. It must be a 15 psi pressure cooker
While this isn’t bad advice, this isn’t strictly true. Regular Instant Pots such as the IP-DUO are proven to be effective if you run them long enough. More here. If you can manage it, do opt for the 15psi models though.
Isopropyl Alcohol 99%
Ahh! Isopropyl Alcohol (IPA) 99% is actually much less effective at killing microbes than IPA 70%. This is because the extra water helps penetrate the microbes that are for killing. It also prevents the IPA from drying out and evaporating before it’s had a chance to work. Always use IPA 70%1. Read more .
Pre-sterilized Vials
These are good if you’re brewing a vial or two just for yourself. Any operation that’s larger than this and you should be sterilizing your own vials to ensure that it’s being done properly. It’s hard to trust that the people on the internet you’re getting “sterile” vials from is doing a good job with it.
Estradiol Enanthate 10mL 40 mg/mL
I understand this is the most popular size and concentration to make, but I will continue to state that it’s poor practice to make vials that are intended to last for about 80 weeks. More here.
Filling & Capping Vials
This should be done under a still air box at a minimum.
HRT Cat claims that bubble point values are readily available for MCT oil on the manufacturer website
This feels like a misunderstanding of how bubble points work. The max burst pressure or “bubble point” is provided by a manufacturer of filters (for high quality vendors, not ebay or amazon ones) as a PSI listing. This has nothing to do with what is being filtered. Not sure what’s being referenced here. I read through the HRT Cat page about this, and that claim is non-existent.
the specific liquid used greatly influences the test results
Right. You should always do the bubble point testing with your preparation, or a mimic of your preparation without the API.
Summary
All in all this is a unique approach to making vials. They are using pre-sterilized vials from a vendor to remove the need to sterilize glassware correctly. I personally think this introduces new risks, like not being able to trust a vendor, but that’s just me. I think if they changed two major things this guide would be a lot better and safer:
- Remove the autoclaving.
- Introduce a much higher standard of aseptic processing.
Caulk Gun filtering
Hey this is pretty cool. I recommend this technique on my page here. Kudos to HRT Cafe for figuring this one out.
Vacuum Syringe Filtering
While this is a cool concept, ultimately it’s flawed. Syringe filters are not designed to be subjected to a vacuum. I went ahead and built this, and I could be wrong here, but it looked to me like the housing of my filters were allowing a substantial amount of unsterile air to get introduced to the solution as it was passing out of the filter and into the vial. I did a full write up here.
Advanced Injections Homebrew Tutorial
I’m going to avoid repeating myself from the above critiques for the most part.
Pre-sterilized vials
This feels funny to me when this guide is advising people it costs around $1,000 to do. At this point, and if you’re brewing in this volume, you really should be sterilizing your own glass, but, to each their own. They offer links to buy off amazon, but do mention possible QC issues.
moving air box… 20” MERV 13 Air Filter
This is, drastically, the wrong filter. A MERV 13 filters traps “less than 75% of of air particles that are 0.3-1.0 micron in size” (source ). Laminar flow hoods are using HEPA filters, which are more like MERV 17. For comparison, our brew filter, which is the primary means of sterilization, controls for anything as small as 0.22 microns in size. What’s happening, then, is that this brew is being exposed to a box fan pushing contaminated air directly onto it.
While this will control for dust, as seems to be what they’re looking to accomplish, it is actually accelerating exposure to bacteria and viruses. This is a major red flag. The entity of the sterilization control in this guide is nullified by this mistake.
The reason laminar flow is the standard, and not a moving air box, is because with laminar flow we can predict where the air is going. It’s coming from the filter and it’s leaving in a straight line out. With something like the moving air box, we’re dealing with turbulent flow. There’s no way to predict what the air is doing. While, yes, it appears to be moving from the filter and out of the box, when you introduce variables like your hands, you stop being able to account for what the air is going to do. You could be creating air pockets and backflow and there would be no way to know. There’s a reason laminar flow is the standard and that people don’t build moving air boxes.
Do not build a moving air box. And if you do (which you shouldn’t) at least get the correct filter (MERV 17).
None of the injections you can purchase from other homebrewers, even the best, are completely controlled for pyrogens.
True. Maybe one day we’ll get there. I’d still prefer that all glassware is depyrogenated, not just sterilized. This is listed as a requirement in USP 7972.
Dry Heat Depyrogenation (Optional)
I get why it’s being called optional, because we can’t control for pyrogens in other areas, but honestly, shouldn’t we still strive to control as many of them as we can? I feel like depyrogenating where we can is a no brainer. In my opinion, all guides should strive to eliminate as much contam as possible, and not cut corners like this.
You can purchase silicone stoppers which can also safely be heated to these temperatures too.
No, you cannot replace butyl rubber with silicone, don’t do this. Benzyl alcohol is proven to be able to evaporate out of silicone. Especially if you’re autoclaving it, and then it evaporates in the vial, and then it encounters the silicone, and can pass through it. (read more)
Cover the openings of the media bottle and the vials with aluminum foil
Nitpick, but in labs the recommendation is to double up the foil, for safety. You should also be sure to leave a corner on kind of loose so the water can evaporate out.
Depyrogenation is likely not a useful activity since we cannot combat pyrogens in the actual injection solution we are preparing.
This is borderline misinformation. Any single thing that we can depyrogenate, we should2. It’s not optional. You remove as much contamination as possible. Always.
sideways to help prevent dust from getting in
I appreciate not wanting dust to get in, but, dust is not actually the problem here. The problem is microbes, which are invisible. Dust is a good signal that something went wrong, as if dust is present then microbes are also present. But the concern here is microbes. This line of thinking is repeated in several places all around these guides. I can’t tell if they don’t understand that they need to be controlling for microbes primarily or not.
Bring the water to a boil using the hot plate. Reduce the temperature and place the media bottle into the hot water bath for 10 minutes.
Okay this one is actually a big problem. The flash point of benzyl alcohol is 101°C/214°F. This is the temperature at which benzyl alcohol is evaporating so much that you can light the fumes on fire. Granted this is for a solution that is 100% BA. But regardless, getting our finished, filtered solution anywhere near this temperature is a really good way to evaporate the benzyl alcohol out of your preparation. Don’t do this.
Do not heat the finished preparation during the dispensing process as you risk evaporating off the benzyl alcohol.
Filling Vials
While they are controlling for dust, the existence of this “moving air box” fully exposes all vials processed in there to the bacteria that is in the air.
Terminal Sterilization
No, this is not terminal sterilization. See sterilization theory and the note above from the other guide they made. USP 797 says “Steam sterilization is not an option… if there is insufficient moisture to sterilize the CSP within the final, sealed, container closure system”2. In the case of our specific CSP, there is no moisture inside the container.
Summary
- The moving air box is introducing more contamination then it’s preventing
- Heating the preparation for filtration and dispensing is compromising to the benzyl alcohol
- Non-aqueous solutions cannot be terminally sterilized by steam. The only way to sterilize them is filtration and aseptic processing.
- Heating the preparation, in all the various ways, risks oxidizing benzyl alcohol to benzaldehyde
This guide is unsafe, and is not recommended. If they switched to a still air box, removed the heating of solution with BA in it, removed the autoclave, and introduced strong aseptic technique, then it would be drastically improved.
I’m of the personal opinion that bottle top filtration is irresponsible without a laminar flow hood. This is because once the product is filtered into the bottle, that bottle has to get exposed to the air in order to dispense it. Even in a still air box, the air isn’t reliably clean enough to risk exposing the full batch to it. With the laminar flow hood, we know that the air that we’re exposing our preparation to is clean and that there is academic research backing up our methods.
Sources
View the library page for access to some PDFs.
Footnotes
Critique: Lena’s Ultimate DIY Guide
You can read about the spirit of the critique here.
Lena basically pioneered DIY, at least the online version of it. She deserves enormous respect. It would be great if she would update the methods she teaches to reflect more modern practices.
Lena publishes her guide on a wiki. My critique is written in response to a Feb ‘25 archive of the wiki here . The live wiki lives here .
The Guide
Lena’s guide is not complex enough to warrant a full critique. Her method can be summarized rather quickly: she recommends you take an empty vial, put all the raw ingredients in it, cap it, shake it, then boil the vial for 30 minutes. Simple as that.
Here’s a quote from the guide:
Those scientifically-appearing (at first glance) claims (mentioning standards and quoting articles) were published as a marketing tool, to denigrate a competitor (me). Noone of my 3800 customers complained of infection. Why? Because actually it’s the opposite: terminal heat sterilization is more reliable than filtering + aseptic procedures.
- Science is real and it’s useful to quote it
- It’s cool that 3800 customers are happy. We, however, have no way of verifying this. I’ve seen plenty complaints about Lena on reddit. Lena is actually banned from posting on r/transdiy. It’s also not super cool to test unverified, untested methods directly on humans, which is what this is.
- There’s no sterility assurance testing happening and no science being referenced so these are super bold claims.
- Using an autoclave (or even boiling) a non-aqueous solution does not meet the definition of terminal sterilization, so using that term is inaccurate. If it did work, it would indeed be more reliable than the dangerous and difficult aseptic process. Making HRT is hard.
In fact, making HRT is exceptionally difficult. It would be so wonderful if there was a reliable method that we knew “just worked” and didn’t require all sorts of fussing around. The unfortunate reality is that compounding pharmaceuticals isn’t so simple, and if it was, would not be so highly regulated of a process.
I hope you can see that the person who writes this guide is operating on the defensive, accusing those criticizing her of being her competitors. She did not take any time to investigate or properly refute scientific claims made against her practices, just is telling people that she’s correct and to trust her. I’d personally choose to trust the 1,000s of hours of research I’ve done into safe compounding practices.
Here are a few major issues with Lena’s method:
Filtering is Required
Let’s suppose that filtration isn’t essential for sterilization of our preparation (which it is). Properly washing the vials is still an essential component to removing any debris that might be in the glass leftover from manufacturing. Additionally, the excipients need to be filtered as well to ensure there’s nothing in them that’s not supposed to be.
You should be very certain and clear that there is no dust or anything else in your vials. Filters are how we do that.
Don’t inject dust.
Boiling a Vial is Not Sterilization
I’ll refer you to the sterilization theory page which has the full explanation as well as links to sources.
- Boiling a vial gets the contents of the vial up to 100C.
- Sterilization that doesn’t have steam contact needs to be heated to 160C for two hours.
- If the contents of the vial were water (which they’re not) then it would still need to be heated to 121C.
- Boiling a vial is heating Benzyl Alcohol past it’s max temperature (more info)
Boiling for sure kills some bacteria. And hell, maybe in some certain scenarios it’s killing most of it. But since we can’t actually see down to the microscopic level, we can’t know if it was effective or not, not without extensive testing.
Benzyl Alcohol is Not Optional
At one point in the guide Lena says:
you may optionally draw 0.2 ml of benzyl alcohol into a syringe, pour it into the vial … If you don’t add the preservative then make sure that each time you draw from a sterilized vial, you take a new syringe. … Without preservative is rumored unsafe, but my customers including those 36 and myself never had an infection because terminal heat sterilization is superior to filtering + aseptic procedures
As well as in other places she mentions that BA is optional, though she does include it in the vials she sells.
You should always use a new syringe and needle each time you draw, the fact she says this is so telling as to what her understandings of even basic aseptic technique is.
There are so many reasons people have not had an infection, but the number one probably being that humans are generally more powerful than a small dose of bacteria being put into our muscles. All the science says that these methods are not reliable in removing bacteria. One day the wrong type of virus or bacteria could make their way into vials that are prepared like this, won’t be killed by the boiling, and will give someone an infection.
People do get infections (and in very rare cases die ) from improperly prepared vials. Thank god it hasn’t happened to trans people (as far as we know), but as DIY grows and misinformation like what Lena spreads grows, it becomes more and more likely to happen.
Please don’t follow Lena’s guide.
If you need a simple way to make a couple vials, my guide is better written, only nominally more expensive, and follows compounding best practices designed to be done on a desk in your home. Read that here.
Critique: Otokonoko
You can read about the spirit of the critique here.
Otokonoko’s guide was taken off the internet but is still passed around in some circles. You can view my backup of their guide here
Guide
Critique in progress…
Brew Role: Staging
this page has not been finished
Staging (/ˈstɑːʒɪŋ/ STAH-zhing) is a brief internship one chef works in another chef’s kitchen in order to learn and to be exposed to new techniques.
You can only learn so much online. You can only learn so much in your discord chat. Shit starts getting real when we get off the computer and into the world. We should be looking for ways to meet up with other brewers, people who we HIGHLY trust, and to sit down and knock out a batch or two of E together.
The most important part of this homebrewing business, in my opinion, is that we spread the knowledge (hence this website). A good website with half decent documentation goes a long ways, but perhaps just as important is something that you can do yourself. We only need one or two good websites that teach this stuff. But we need dozens or hundreds of homebrewers who are willing to bring people into their kitchens and to teach.
…
Consider finding a kitchen to stage in.
…
Consider bringing on a stage for your next brew.
…
A good situation will be one where you’re open to learning from each other, even if one person has more knowledge than another.
Harm Reduction? But Who is Getting Hurt?
HRT Mom is all about harm reduction. Is it a good idea for you, an untrained rando, to create injectable preparations in your kitchen? No. The answer is no. This is a bad idea. However, we as a trans community have come to collectively understand that having access to lower quality hormones is far preferable to the alternative of having no access to hormones.
It is in this place of using lower quality hormones (than what is available from Pfizer, for example) that we can start to ask, “if people are going to do this anyways, then how do we help make sure that no one gets hurt?”
A Look at Current Methods
The prevailing methodology for homebrewing estradiol has the following characteristics:
- 10mL vials
- 40mg/mL concentration
- Improper and likely ineffective sterilization technique
Theoretically this results in vials that have bacteria in them that get used for 80 weeks, causing the amount of bacteria in the vial to steadily grow over that period of time each time a needle is introduced to draw from it.
”But No One Is Getting Hurt”
Despite these poor practices, anecdotal evidence suggests that no harm is coming from people injecting homebrew made these ways. This appears to be true, at least in the short term. We are, however, unable to track long term outcomes of using vials made using techniques that are not up to certain standards. The only way to do so would be to perform long term clinical trials, which is out of scope for the DIY community.
”So Why Go Through All This Extra Trouble?”
The reason we go through all this extra trouble is because there are dozens of questions about DIY that we do not have the answers to. Some of these questions might be:
- What are the long term effects of injecting small amounts of bacteria?
- What types of bacteria and viruses tend to survive insufficient sterilization?
- What can those bacteria and viruses do to a person who injects them?
- What are the outcomes for injecting dust or small particles on a routine basis?
- What are the extreme edge cases for if something goes wrong with a batch?
Given that these are questions that I have, that I propose are valid questions about DIY, I suggest the following logic:
Prevailing logic: I don’t know the answers to these questions, but I assume that the answers are not relevant as I have no information to suggest otherwise.
Mom logic: I don’t know the answers to these questions, and I acknowledge that the answers could have serious implications. I’m unwilling to leave this grey area up to chance, especially considering we’re testing our methods directly on humans.
We go through all this extra trouble to make the safest, cleanest brew possible because these are real humans with real human lives who are trusting us to make something they will inject. There’s no room for cutting corners unless there is actual empirical evidence suggesting otherwise.
Experiment: Butyl Rubber Stoppers + Ovens
Rubber stoppers off-gas when heated in the oven
A colleague and I did some experimentation.
Goal: Can we determine what level of heat causes butyl rubber stoppers to become compromised?
Methods: We heated stoppers up in the oven at various temps, then tried to core them once they cooled.
Results: DO NOT PUT STOPPERS IN THE OVEN. They off-gas, quite horribly, when approaching dry heat sterilization temperatures (160C). If a stopper was closing a vial, and then that vial was heated in an oven to sterilization temperature, the rubber stopper would off-gas directly into the vial. I’m no chemist, but I’d guess that the vaporized rubber could bind to oil in the preparation.
Stoppers are safe to autoclave but not dry heat sterilize.
Also, we did not successfully core a single vial from this experiment. Either we suck at coring or rubber stoppers hold up pretty good to light heat.
Syringe Filter Vacuum Filtration
this page has not been written yet
This technique was made by HRT Cafe. I think it’s too risky to use filters in ways they weren’t designed, so I don’t recommend doing this. Syringe pumps are a better alternative.
Library
This includes:
- Compounding Sterile Preparations, 4th edition
- USP 71, 2024 edition
- USP 797, 2024 edition
- USP 2024 edition (rar format, 541mb)
- Handbook of Pharmaceutical Excipients, 6th edition
- European Medicines Agency: Guideline on the Sterilisation of Medicinal Product, etc, 2019
- A paper on Silicone + Benzyl Alcohol
Also interesting:
DIY Resources
- HRT.cat (no pdf available) (backup (April 2025) )
Where to Find More
I find my sources through four primary methods:
- Libgen
- Anna’s Archive
- Sci-Hub
- Google search keywords +
filetype:pdf